Starting an ATV can be daunting, especially if it is your first time. However, it becomes effortless with the proper knowledge and practice. First of all, read the manufacturer’s manual before attempting to start the ATV, and make sure you follow the prompts as directed in the manual.
With minimal variations depending on the make and model of your ATV, the process of starting it should be the same. This includes several easy steps, from pointing the ATV in a safe direction via turning on the fuel valve and positioning the engine stop switch in the On position to pressing the starter button. Just ensure there is enough gas in the tank and the battery is charged.
However, this is just an overview and the actual task is not that short, and you need to walk through the entire procedure if you want to learn how to start an ATV from scratch. In this post, the whole process is broken down into easy steps so that even an amateur ATVer can turn on his ATV by the time he finishes this guide.
This inclusive guide starts with the things one should know and execute before attempting to start his ATV to avoid common issues causing any ATV not to start. And experienced riders may find this guide more interesting as they can learn several methods of starting an ATV without the key in 5 different ways.
Jump To Contents
- Understand how an ATV operates
- Tasks before you start your ATV
- How to Start the ATV (off) in 8 Simple Steps
- Read ATV Manual Coming with Your Model
- 1. ATV faces the correct direction
- 2. ATV’s transmission is in park or neutral position
- 3. Parking Brakes Are Set
- 4. Fuel valve is in ‘On’ position
- 5. Stop switch is turned on
- 6. Place the choke in the “on” position for a cold engine
- 7. Switch on the engine
- 8. Now, Start the ATV Off
- How do I start my ATV without a key – 5 Methods
- Should you have a replacement key made?
- Frequent ATV Starter Problems to Check Beforehand
- Wrapping Up
Understand how an ATV operates
Understanding the basics of an ATV is crucial for anyone who wants to operate one safely and efficiently. This includes knowing how to start and stop the engine, properly shifting gears if applicable, operating the brakes effectively, and maintaining appropriate speeds based on terrain conditions. Without understanding how ATV operates, you cannot master the fundamental skill of starting an ATV properly.
Engine: How it powers the vehicle
Understanding how engines work can help ATV riders appreciate their machines better and troubleshoot any issues that may arise during operation.
The engine is the heart and soul of an ATV. It is responsible for converting fuel into energy that powers the vehicle. The process begins with the fuel being mixed with air in a carburetor or injection system, which creates a combustible mixture. This mixture is then ignited by a spark plug, causing an explosion that drives the piston down, which in turn rotates the crankshaft.
The rotation of the crankshaft powers various components, including the transmission and drive shafts, which ultimately drive the wheels. The amount of power produced by an engine depends on its size and design. A larger engine typically produces more power than a smaller one.
Transmission: How gears shift
The transmission on an ATV is responsible for transferring power from the engine to the wheels. It works by using a series of gears to change the speed and torque of the engine, allowing it to perform different tasks with varying levels of power. When shifting gears, several factors come into play.

Firstly, there’s the clutch which disengages or engages the engine from the driveline when changing gears. The clutch plates separate when you pull in the clutch lever, allowing you to shift gears smoothly without causing damage to your ATV’s transmission or stalling out. Secondly, there are gear ratios that determine how much power is transmitted from one gear to another. Lower gear ratios provide more torque and acceleration but lower top speeds, while higher gear ratios allow faster speeds but less torque.
Finally, there’s also a shift pattern that riders must follow when shifting between gears. Depending on your ATV model and make, this could be a foot shifter or a hand shifter located near your left thigh. To shift up or down through the gears successfully requires coordination between throttle control, clutch engagement/disengagement and smoothness in operating either hand/foot shifter.
Suspension and tires: Absorbing shock and grip
The suspension and tires of an ATV are two critical components that work in tandem to provide a smooth ride, absorb shocks, and ensure maximum grip. The suspension system comprises shock absorbers, springs, and other parts that help the vehicle traverse rough terrains without taking too much damage. These components work by compressing or expanding when the vehicle encounters bumps or obstacles on the road.
On the other hand, tires play an equally important role in ensuring optimal performance in different environments. They provide a crucial link between the ATV and the ground surface. Different types of tires are designed for various terrains such as mud, snow, sand, and rocks among others. For example, knobby tires are perfect for loose terrain while slicks are ideal for flat surfaces like asphalt. Besides the types, constructions – bias and radial – and ply rating of ATV tires merits crucial attention.
Understanding how these systems function is vital for every ATV rider who wants to enjoy a safe yet thrilling riding experience with minimal accidents or injuries.
Brakes: The importance of stopping power
A key component of an ATV is its braking system, which provides the necessary stopping power to keep riders safe and prevent accidents. The importance of a reliable braking system cannot be overstated, as it plays a significant role in controlling the speed and direction of the vehicle. Without proper brakes, an ATV could easily spin out of control or collide with obstacles, causing serious injury or even death.
The most common types of brakes found on ATVs are hydraulic disc brakes, which use brake fluid to apply pressure to a rotor and slow down the wheels. This type of brake is preferred for its reliability and durability in off-road conditions. Other types include drum brakes and mechanical caliper brakes, but these are less commonly used due to their lower performance capabilities.
Controls: Steering, throttle, and more
The controls of an ATV are essential to operate the vehicle efficiently. The steering is controlled by handlebars located in front of the rider. The handlebars are connected to the wheels through a steering mechanism, which allows for easy maneuvering of the ATV. By turning the handlebars to the right or left, riders can change direction swiftly.
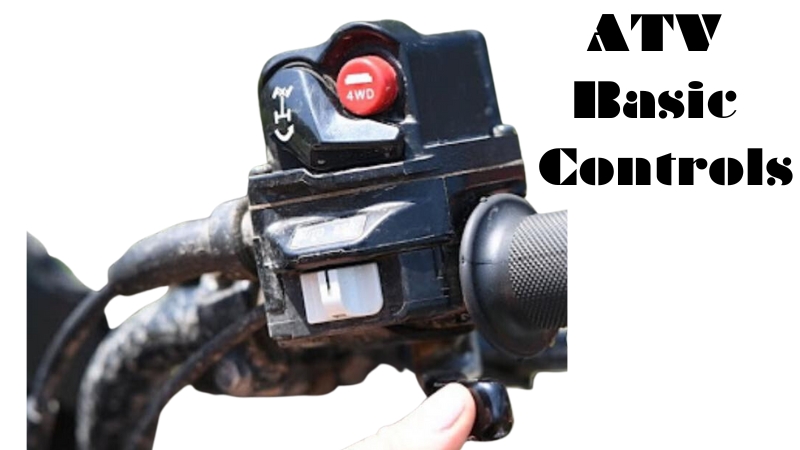
The throttle control is found on the right-hand side of the handlebar and regulates speed. When pressed, it increases acceleration, and when released, it reduces speed. Additionally, there is usually a brake lever located on the left-hand side that allows riders to slow down or stop while riding.
Other important controls include gears and clutch levers. Gears help with controlling speeds and power output while using less fuel consumption. Clutch levers allow you to switch between gears smoothly by engaging and disengaging them when necessary.
Understanding how these different controls work together is crucial for any ATV rider’s safety and enjoyment while operating their vehicle in various terrains both off-road and on-road environments.
Tasks before you start your ATV
Before we delve into how you can start your ATV, you should accomplish several tasks. They include:
- Ensure your ATV has enough fuel to drive you to your next destination. If it does not have enough fuel, consider topping up the current amount to reach your desired destinations conveniently.
- Ensure that you have the proper safety equipment in place. Some of the vital equipment you should have in place includes your pair of gloves, helmet, and riding boots, among others.
- Check whether your ATV has the right fluid levels. Some of the ATV fluids you should watch include engine oil, coolant levels, and so forth. Also, check if there are any leaks within the engine section.
- Check and ensure that your tire pressure is sufficient. Such is ideal if you have not ridden your ATV for quite some time. In case the tire pressure is not enough, top up a bit but avoid over-inflating your tires, as this might be disastrous. With a low-pressure tire gauge, you will be good to go.
- Ensure that the axle nuts and the wheel nuts are firmly in place. In case some are loose, tighten them, and you will be all set.
How to Start the ATV (off) in 8 Simple Steps
The process of starting an ATV is made easy and straightforward by breaking the entire process in several steps. This is an elaboration of a run-down of all the steps having two parts – steps 1-7 for starting the engine to warm up and final step 8 tells you how to start off or move the ATV. Yes, reading your ATV manual will tell you where and how to start.
Read ATV Manual Coming with Your Model
All ATVs are not the same. Some models are just made for recreational purposes. However, other models are ideal for towing heavy substances. In fact, some models come with a complex ignition system, while others have a simple ignition system. Therefore, you need to read the manual that came with the quad to know how you will start it.
More importantly, note that the method of starting the ATV will depend on whether your model is manual or automatic. Thankfully, the user’s manual has all these details. Besides this, you will be able to know whether your model has a twist throttle or thumb throttle. Supposing your model does not have a manual, consider visiting the manufacturer’s official website and downloading the manual of your specific ATV model.
Whatever model ATV you ride or prefer, the starting process is identical, and the manual would tell you to execute steps 1-8. Ensure:
1. ATV faces the correct direction
Your ATV should face the correct direction before you start its engine. This way, your safety will not be compromised if you start the model faster than you ought to or lose control moments after starting it. Therefore, ensure that it faces in a safe direction before you can ignite its engine.
2. ATV’s transmission is in park or neutral position
Ideally, the transmission should either be in a ‘park’ or ‘neutral’ position. If you do not know these positions, read your manual to learn more about them. When it comes to automatic models, all you need to do is to set the model in the ‘park’ position.
3. Parking Brakes Are Set
Here, you should put or set the model in a parking position so that you can be safe when starting its engine. Such is ideal for automatic ATVs.
4. Fuel valve is in ‘On’ position
Switch the fuel valve to either the ‘Reserve’ or ‘On’ position, depending on the amount of fuel your ATV has.
5. Stop switch is turned on
Doing so prevents the engine from starting if the switch is in Off mode, which could cause severe damage to both you and your ATV.

Additionally, having the switch in the correct position ensures you can easily turn off the engine if necessary. For example, if you encounter an obstacle or need to stop suddenly, being able to turn off your ATV quickly can prevent accidents and injuries.
6. Place the choke in the “on” position for a cold engine
When your ATV engine is cold, it may not start right away because the fuel may not be able to ignite properly due to low temperatures. To solve this problem, you need to prime the engine by placing the choke in the on position.
The choke helps regulate the air and fuel mixture in your ATV’s carburetor by restricting airflow. Turning on the choke reduces airflow and increases vacuum pressure in the carburetor, which allows more fuel to enter the combustion chamber. This process ensures enough fuel for proper ignition and starting of your ATV.
But you should turn off the choke immediately once your ATV engine warms up. Leaving it on could cause too much fuel to enter your engine, leading to flooding or fouling of spark plugs.
7. Switch on the engine
Locate the engine stop switch and turn it to either the ‘Start,’ ‘Run,’ or ‘On’ position. Depending on your ATV’s type, the language used here might vary. However, the point is the same. In most cases, the engine stop switch is usually located on the right side of the ATV.
If the battery has enough charge and there are no issues with the current coming from the battery to the starter, the ATV engine should start right away. In case the engine is cold, you need to set the choke feature in the ‘On’ position. After a short while, the engine should be able to start. Once the engine warms up, return the choke to its usual position.
8. Now, Start the ATV Off
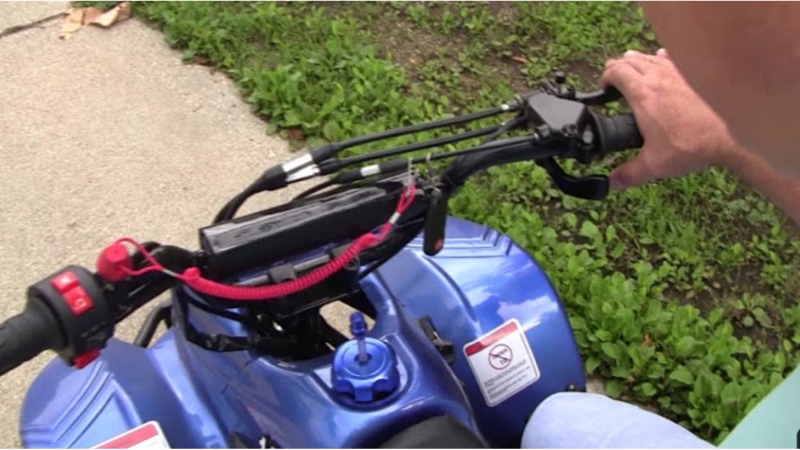
After starting the engine, as is said in the 8th step, your ATV engine should be warm enough to start off. Now, to start your ATV off, follow these steps.
Activate hand brake: Before starting ATV, make sure that the hand brake is engaged correctly. This small but crucial step can prevent accidents and injuries.
To apply the hand brake, locate the lever on the left side of your ATV’s handlebars. Pull the lever towards you until it clicks into place. Ensure there is tension in the brake cable and your ATV does not roll when you push or pull it.
Release the parking brake: Once you have mounted your ATV and activated the hand brakes, it’s time to release the parking brake. The parking brake is usually located on the left-hand side of the handlebar and can be engaged by pulling up on it. Push down on the lever with your thumb or fingers to release it.
It is important to make sure that the parking brake is fully released before attempting to move your ATV. Failure to do so could damage your vehicle or injure yourself.
Shift into gear: After releasing the parking brake, it’s essential to shift into gear to start off your ATV. We already know that depending on your ATV type, the gears can either be foot-operated or hand-operated. For instance, ATVs with automatic transmissions usually have a gear lever on the handlebars’ left side.
If you’re using an ATV with a manual transmission, press down on the clutch lever before shifting gears. This will help disengage the engine power from the rear wheels and prevent stalling while changing gears.
Once you’ve shifted into gear, slowly release your clutch lever while gently applying pressure to your throttle. Note that each gear on an ATV is designed for a specific speed range and terrain.
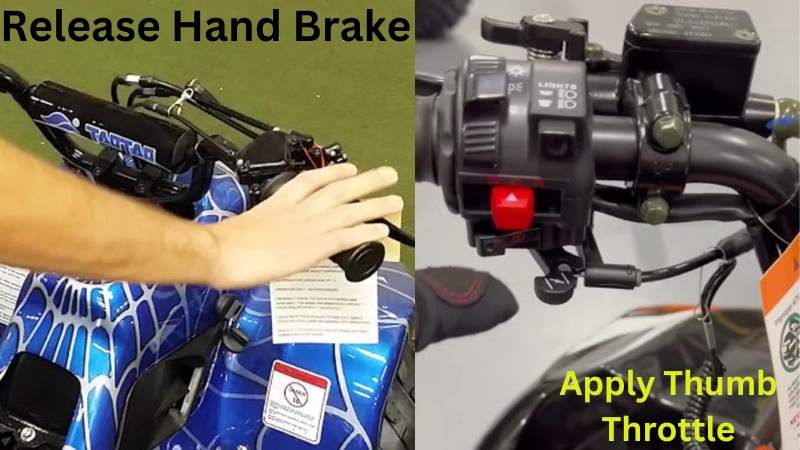
Release the hand-brake and apply the throttle slowly: Now apply the throttle slowly and steadily, releasing the hand brake. This will help prevent sudden jerks or movements that could cause instability or an accident. Additionally, applying the throttle gradually allows you to get a feel for how the ATV responds to your inputs and gives you more control over your ride.
As you begin moving forward, keep in mind that different terrains may require throttles differing widely.
How do I start my ATV without a key – 5 Methods
Although most ATV users start their quads with a key, there are some instances when you lose, misplace, or even forget your key somewhere else. This can cause a great inconvenience but should allow you to start your ATV. Luckily, you have several popular and peculiar ways of starting ATV with no key. Here you go with 5 different ways to start ATV without a key.
1. Perform a kickstart
One way to start an ATV without a key is to perform a pull or kick start. Although this method does not work magic on all ATV models, it can help you get started during desperate moments. If you have your user’s manual, starting your ATV using this method will be easier. However, if you do not have the manual with you, consider following these steps:
- Remove your ATV’s front hood. Typically, this is the part that covers the CDI and electrical components.
- Once you remove the front hood, look out for the wire connecting your ATV’s engine to the ignition switch. After that, remove the plug that connects that wire to the ignition switch.
- Once you are done, return the hood to its rightful position and then kickstart to start your ATV.
2. Use a Screwdriver

You can also use a screwdriver to start your ATV. In most cases, this method is used by thieves. However, this method can work magic if you need to remember or lose your ATV key. Here is how to start an ATV with a screwdriver:
- Get your screwdriver ready.
- Place the screwdriver into the ignition keyhole and then hammer it in.
- Start your ATV’s engine as though you were using a conventional key.
Note that the screwdriver will break the lock’s pins, allowing you to switch on your ATV’s engine. This method works, but it ends up damaging your ATV’s ignition. Therefore, you might have to repair the ignition once your ATV starts. The only problem is that you have to ride the ATV with the screwdriver popping out.
3. Disassemble the ignition to trigger it manually
As the heading suggests, you will be removing the ignition switch from the ATV and then starting your ATV manually. Although this method can help you start your ATV, it is only ideal if you have plans to install a new ignition on your ATV anytime soon. If you plan to use this method to start your ATV, consider following these steps:
- Loosen up the ignition from the ATV. Once this component is loose, you can see that the ignition is simply a cylinder that separates into two main pieces.
- Remove the lower half of the cylinder connected to the cord that goes to your ATV’s engine.
- If you look closer at your ATV’s ignition, you will see a piece of metal with metal connectors. Remove that piece of metal and then check how the metal lines up with the connectors on the other side of the ignition.
- Ensure you place the metal connectors correctly and start your ATV’s engine.
Once you are done with your ride, disconnect these two wires. If you fail to disconnect these two wires, your ATV’s battery will likely drain. To be safe, consider installing a simple switch where your ignition used to be so that you can switch it on and off the way you please.
4. Jump the solenoid
This one works well on ATVs that have an electric start option. Typically, the solenoid is close to the wiring harness and the battery. Depending on the kind of quad you have, you might be prompted to put the side panel aside to see it.
The solenoid normally has two wires emanating from it. However, it might have other smaller wires that come from it. Since we are only interested in the two main wires, our focus will shift to them for the time being.
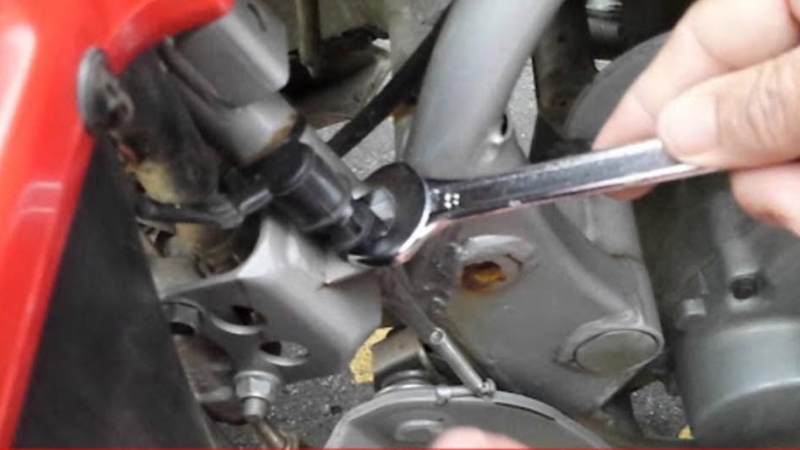
Here, you need to lay a wrench or a metal between these two connectors, and you will be in a position to start your ATV. As you use a metal or wrench, be careful not to touch anything else or risk short-circuiting your quad. Worse still, you might end up damaging your engine’s components unawares.
5. Hot Wire your ATV
This method entails changing the wires to bypass your ATV’s ignition switch. This means you will leave the circuit open but provide the much-needed spark to start your quad. If you want to hotwire your ATV, 3 main methods can help you get started. Depending on the kind of ATV you ride, choose one of them and then start your ATV. These methods include:
Method 1
- Hot Wire your ATVLook out for the wire that connects your ATV’s battery to the solenoid
- Cut the wire that connects the ATV’s solenoid to the battery
- Look out for the red wire that emanates from the battery component of your ATV
- Join the red wire with the wire you had previously cut
- Start your ATV engine right away.
Method 2
- Look out for the wires that emanate from the ignition section. Remember that the first wire will always be fused and is red.
- After spotting the red wire, remove one of the wires that come from the ignition section. After that, look for the kill switch wire and its twin color in the ignition switch connector. In most cases, this wire is green in color. Be careful not to connect the green wire. Also, do not connect the kill switch wire as well.
- Check out the kill switch wire located in the wiring harness. This wire is black in color and has a white stripe.
- Ensure that you disconnect the kill switch wire and earth wire you had previously identified. This will prevent them from causing a short circuit, thereby killing your spark.
- Once you do this, cut the two wires you had identified earlier and connect them using electrical tape. By doing this, the ATV should start.
- After reaching your desired destination, disconnect those wires so your battery does not get drained.
Method 3
- Locate and then remove the top part of the instrumental cluster housing. Here, you will have to remove 3 Phillip screws in order remove it dislodge it.
- Once you remove that part, remove the key switch assembly.
- Look out for the electrical connector. The switch assembly is normally attached to this component.
- Here, you will come across 4 main terminals. For optimal results, look for the one with a 12 Volt wire. This wire should be red in color.
- Take a jumper wire and then place it between the red wire and the terminal adjacent to it. By doing so, the instrumental panel will light up.
- Thereafter, install a jumper from the terminal located at the opposite side of the terminal bundle. Once you are done, touch the jumper emanating from the terminal housing with a 12-Volt wire. By doing so, you will be able to start your ATV engine right away.
- Once the engine starts, you are free to remove the last jumper that touches the red wire. In case you want to shut your ATV down, just slide the kill switch, and you will be good to go.
Should you have a replacement key made?
Yes. If you have misplaced or lost your ATV keys, you need to replace the key as soon as possible. By replacing your key, you will not have to grapple with the hacks discussed above.
Although some of those methods can be a lifesaver if you do not have a key, they can be risky as you might get electrocuted. Therefore, you must have the right skills and competencies to start your ATV without a key.
The good news is that many dealers can help replace your lost key. All you need to do is to tell the dealer the code stamped on your key. Once the dealers know this code, he or she should be able to make a new key.
Better still, you can let your dealer know your ATV’s model and VIN. In case the dealer can be trusted, he or she can make a replacement key for you. Finally, if the code is not stamped on your ATV key, consider hiring the services of a professional locksmith. Since some professionals have these key codes, you will get a precise replacement key.
Frequent ATV Starter Problems to Check Beforehand
A variety of issues can cause your ATV not to start. Here you go with the frequent ones to avoid:
Drained & Dead Battery: One common issue is a dead battery, which can occur if the ATV has not been used for an extended period or if the battery needs to be revived or replaced.
But if you encounter a drained battery, charge your ATV battery so long it is not fully charged, reaching its recommended voltage.
Faulty Starter Solenoid: Another problem often encountered is a faulty starter solenoid, which can cause clicking sounds when starting the engine. This may be due to corrosion on the terminals or wiring issues.
Excessive Oil in Engine: Engine flooding with oil can undoubtedly cause an ATV not to start. If too much oil is added to the engine, it can flood the combustion chamber and prevent proper ignition. This can cause the engine to stall or fail to start altogether. ATV owners need to check their oil levels regularly and only add as much as the manufacturer recommends.
Battery Disconnect Switch: A battery disconnect switch is a feature common with advanced ATV models. It allows the rider to quickly isolate the battery from electrical systems when not in use. However, it can also cause issues if not in the On position. So, check if this switch is in the Off or On position. Turn it off when starting your ATV and turn it on when the ATV is not in use.
Starter Motor: Starter motors can also fail over time due to wear and tear or insufficient maintenance. This can result in slow cranking or complete failure of the motor. So, checking ATV starter should be a regular ritual to avoid starting inconvenience.
Other potential culprits include dirty carburetors, clogged fuel filters, and faulty ignition switches. Regardless of the specific cause, ATV owners need to check any starter problem promptly to avoid more serious damage down the line.
Wrapping Up
Starting an ATV is not difficult per se though lengthy. If you have the key, consider all the ideas we mentioned above, and you will be good to go. In case you need a key, or have misplaced it, consider trying any of the methods that we have discussed above. These are all on how to start an ATV and get your engine roaring and ready to propel you to any destination you please. Ensure you have known and done the things right you should do before and when starting your ATV.
ATVNotes is an off-road resource focused on ATV and UTV winching, recovery systems, safety gear, tires, batteries, and essential off-road equipment. Content is produced by the ATVNotes Expert Team and written from the perspective of a practical off-road recovery advisor, emphasizing real-world performance, system compatibility, and safety-first practices across trail riding, utility use, and off-road exploration.

1 thought on “Guide to Start an ATV – With & Without Key”