A faulty ATV starter is one of the several causes of your ATV starting issues. Testing ATV starters might seem a hassle and something out-of-the-world-complicated, but it is relatively easy and hassle-free once you get the gist. Here you have an overview of what and how to test an ATV starter before going to the detailed guide.
Testing the ATV starter begins with checking the motor, which involves connecting it directly to a power source, such as the ATV battery, and listening for unusual noises. Then, see if there is any issue with the starter solenoid – contactor, relay, or if it fails altogether. Complete the test by checking for continuity between the starter motor’s positive and negative terminals and the starter solenoid terminals. But before you begin testing your ATV starter, ensure that the certain ATV battery or other battery, taken as the power source, is fully charged.
Here is an easy-to-follow guide for more convenient and efficient ATV use to help you get through this task of testing your ATV starter.

Jump To Contents
- What is an ATV Starter and how does it work?
- Tools You Need
- Preparations and Precautions
- Test Your ATV Starter: Motor, Solenoid, Relay, and Connections
- Test Starter Motor and Solenoid
- Testing Starter Motor
- Testing the Starter solenoid
- Test Starter Motor and Solenoid Jointly
- Test ATV Starter Relay/Switch
- Check for Continuity among Different Terminals
- Check for Damaged wiring or Corroded connections
- Troubleshooting the ATV Starter
- FAQs
- What Type of Multimeter should you use for ATV Starter Testing?
- How do I know if my ATV starter is faulty?
- What signs should I look for to determine if my starter is okay?
- Can I clean my ATV starter?
- Testing ATV Starter Made Easy and Simple
What is an ATV Starter and how does it work?
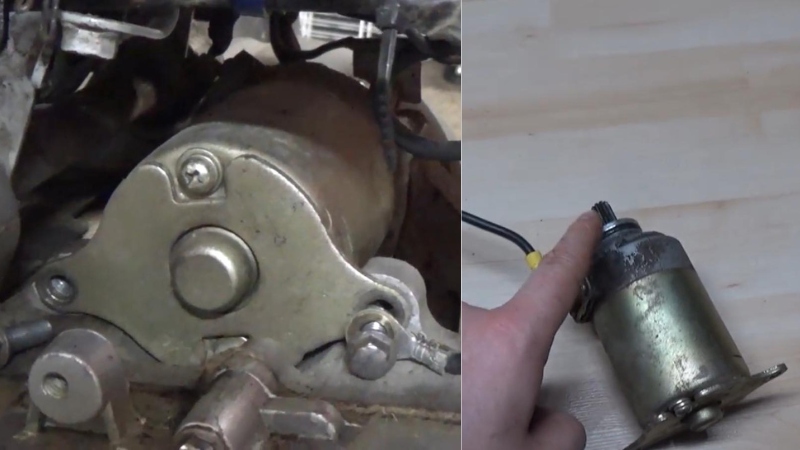
An ATV starter is an electric motor that turns the engine over by engaging with the flywheel to initiate combustion. The starter comprises the motor and the solenoid working together to provide the necessary power for starting the ATV engine.
Starting an ATV can be complicated without a reliable starter motor. The rider has to use their physical strength to push-start the vehicle or use external tools like jumper cables and battery chargers. This can be time-consuming and frustrating, especially when navigating rugged terrain or on a trail ride. A quality ATV starter provides quick starts every time, allowing riders to hit the trails faster and more confidently.
With different types of starters available in the market today, riders should choose one that suits their specific needs, whether for racing or leisurely exploring challenging terrains. Once the suitable starter is bought and set up, you must maintain it to enjoy the uninterrupted service this component is meant for. And you may need to test it when you are not getting the usual response. Here you have the testing process broken down into simple steps.
Tools You Need

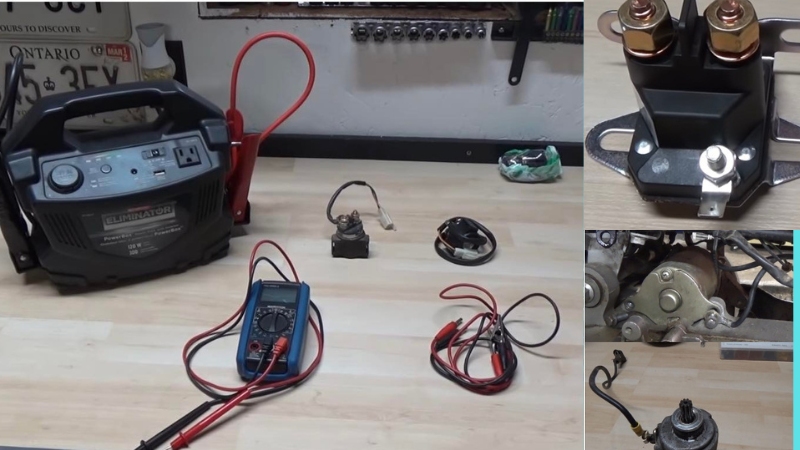
The tools you will need are simple and not many:
- Jumper cables
- Test leads
- Multimeter
- Alligator clips
- Swivel ratchet
- A 12 Volt battery
Preparations and Precautions
- Removal of Flammables: Remove flammable liquids before testing the ATV starter.
- Secure Lifting of Large ATV: If your vehicle is large and the kind where you need to get under it, then make sure it stands on something sturdy and will not fall on you.
- Securing the Starter: If you conduct the test on a workbench, you must secure the starter with a vice or clamp. A spinning starter motor produces centrifugal force and sparks. So, you will run a considerable risk of letting it fly off if not secured.
- Optimized and Secured Power Source: You may use the ATV battery when testing is done, keeping the starter attached in the assigned location. I suggest conducting the test on a workbench for hassle-free testing at reduced risk. Whatever method you apply, you must ensure the battery is fully charged, and the voltage reading should be 12.6 or above. If it is below 12.5 voltages, recharge it, and it’s better to check if it drops significantly when starting the ATV. If you conduct the test on the ATV, you should use a clamp or anything else to ensure the battery will not jump out and fly off the room when the starter is exerted. Now turn off the engine; if your vehicle has a parking option, enable it.
Test Your ATV Starter: Motor, Solenoid, Relay, and Connections
A dead battery is one common reason your ATV starter may need to be fixed. As the battery ages, it loses its ability to hold a charge, making it difficult for the starter motor to turn over. But the battery is not a starter component, and I would not include it as a testing step while testing an ATV starter. The battery testing falls into the process of testing the starting system.
The key reason for a malfunctioning starter could be the motor, solenoid, or solenoid switch/relay. A faulty solenoid can prevent proper current flow from reaching the starter motor, causing it not to work.
Additionally, dirty or corroded starter connections can cause issues starting your ATV. Over time, dirt and debris can build up on the connection points between the battery and starter motor, leading to poor electrical conductivity and failure to start your vehicle.
So, when your ATV starter is troubling, the testing includes the following to determine where the problem lies in the starter.
- Testing the Starter Motor and Solenoid
- Testing the Solenoid Switch/Relay
- Continuity Test
- Testing the Electric Connections
Test Starter Motor and Solenoid
You may find two types of starters in your ATV – one with a separate starter motor and a solenoid and the other having these two components separate but featured with a reduction (Bendix) gear and one-way clutch to turn the engine. So, when watching out for malfunction in the starter, you need to check the starter motor and solenoid separately for the first type and also check the two jointly for the second type of motor.

Testing Starter Motor
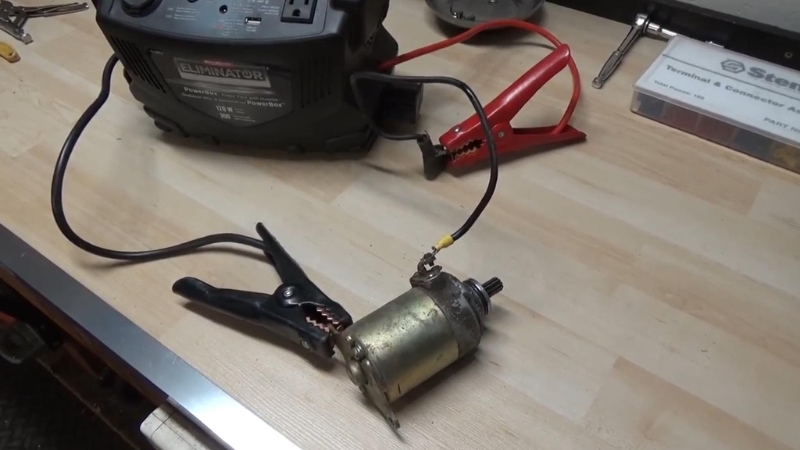
Connect the negative jumper cable to the battery’s negative terminal and the jumper cable’s free end to the starter motor’s body. Put the positive jumper on the battery’s positive terminal and the other end on the nut of the solenoid that sits the farthest from the starter motor (one that secures the battery’s wire ranging to the starter motor).
Touch the negative jumper cable’s free end against the battery’s negative terminal. The motor must start spinning if it is in good condition; otherwise, you must replace it.
Testing the Starter solenoid
You must connect the negative jumper cable to the negative terminal of the ATV’s battery and the starter body’s motor. You will now have a positive jumper to connect to the positive terminal. Touch the positive jumper’s free end to the solenoid’s spade terminal. If you hear no sound from the solenoid, you must replace your starter solenoid. But if it sounds like an audible click, the problem may be elsewhere in the starter mechanism.

Test Starter Motor and Solenoid Jointly
Connect one end of a negative jumper cable to the negative terminal of the fully charged battery, and the free end of the negative terminal should touch the body of the starter motor.
Then, take the positive jumper cable to the battery’s positive terminal. The free end should touch the solenoid nut that secures the wire from the battery and another wire to the starter motor.
Now take a test lead to connect to the positive jumper cable you have attached to the solenoid. Take the free end of the test lead and touch the spade terminal of the solenoid.
If they are okay, the starter motor should spin, and the solenoid should force the reduction gear out of the ATV starter motor. In that case, you should seek trouble elsewhere in the solenoid relay/switch.
Test ATV Starter Relay/Switch
If your ATV starter motor spins and solenoid makes an audible click in the test accomplished above, the problem may be in the starter solenoid relay. Solenoid has three/four terminals used for connections – from the battery and running to the starter motor and ignition switch. So, check for continuity tests between the terminals and watch out for frayed or corroded connecting wires coming to and going from the solenoid relay.

Check for Continuity among Different Terminals
Set your multimeter to measure resistance or continuity. Touch one probe of the multimeter to the ground terminal of the relay socket and touch the other probe to each of the other terminals. The resistance should be zero or close to zero when the circuit is closed and infinite when it’s open.
If you find any readings that fall outside this range, there is likely no continuity between these terminals. It’s an indication that your starter relay is faulty and needs replacing.
However, if there is continuity between these two terminals, it indicates that current can flow through them when activated by the ignition switch signal.
It’s important to note if there is any indication of resistance or lack of continuity in other areas of the circuitry leading up to these two points on either side of a starter relay contactor coil. Suppose there may be damaged wiring or corroded connections. Even though both sides might show good continuity under test conditions, this will also affect its operation.
Check for Damaged wiring or Corroded connections
If your ATV doesn’t start, it could be due to damaged wiring or corroded connections in the starter relay. You will need a multimeter and some basic electrical knowledge to test for these issues.
First, disconnect the battery and locate the starter relay. Check all of the connections for dirt, corrosion, or loose wires. Use a wire brush or sandpaper to clean any dirty contacts.
Next, using a multimeter set to Ohms (Ω), test each connection by placing one probe on each end of the wire. A zero reading indicates no resistance, and that connection is good. A reading above zero indicates resistance, and that connection may be bad.
If you find any bad connections or wiring damage during this process, replace them before starting your ATV.
Troubleshooting the ATV Starter
If you have gone through the tests and all seems to be in order, but your ATV still won’t start, try the following:
- Check if the ignition switch is working properly.
- Ensure that the voltage regulator is working correctly.
- Check the spark plug for signs of wear and tear, and replace it if necessary.
If all these tests fail, you may have a bigger problem. Get professional help, or consider replacing the starter motor/solenoid completely.
FAQs
What Type of Multimeter should you use for ATV Starter Testing?
When testing the starter on an ATV, one of the essential tools you’ll need is a multimeter. Yes, a digital multimeter should be the preference. Why?
First and foremost, digital models are much easier to read and provide more accurate readings overall. You’ll also want a multimeter that has both voltage and continuity settings.
The voltage setting will allow you to measure the voltage output from your ATV’s battery, while the continuity setting will help you determine whether or not there is a complete circuit between various components in your starter system. Ultimately, choosing the right type of multimeter for testing your ATV’s starter comes down to having access to accurate readings across multiple settings so that you can diagnose any issues quickly and effectively.
How do I know if my ATV starter is faulty?
You can test the starter motor with a multimeter or jumper cable. If the starter doesn’t spin when connected to the battery, it may be inaccurate and need to be replaced. You can also test the solenoid and relay to check for electrical resistance or voltage drop.
What signs should I look for to determine if my starter is okay?
You should look for a strong click sound when the starter is engaged and electrical resistance or voltage drop within an acceptable range. If the starter is not engaging or producing weak clicks, it may not be very accurate and needs to be replaced. Moreover, inspect the battery and wiring connections for signs of corrosion or wear and tear.
Can I clean my ATV starter?
Yes, you can clean your ATV starter. It is essential to regularly maintain your ATV starter to prevent it from becoming too dirty or clogged and causing the engine not to start correctly. To clean your ATV starter:
- First, disconnect the negative battery cable before taking off the cover of the starter. Then remove any visible dirt, dust, or debris using a brush.
- Use compressed air to remove any additional dirt particles that may have stuck in the motor components.
- Finally, use some electrical contact cleaner and a rag to clean the terminals of your starter. After reassembling it all, reconnect the negative battery cable and test your ATV starter to ensure it operates correctly.
Testing ATV Starter Made Easy and Simple
That’s all about how to test atv starters – the easier, quicker, and more efficient. Now you have all the information you need to troubleshoot your ATV starter problems quickly and easily. Knowing how to test the starter motor, solenoid, and relay can save you time, money, and hassle. Remember that a faulty starter can cause severe problems if not checked regularly; stay informed and safe! Happy ATVing!

ATVNotes is an off-road resource focused on ATV and UTV winching, recovery systems, safety gear, tires, batteries, and essential off-road equipment. Content is produced by the ATVNotes Expert Team and written from the perspective of a practical off-road recovery advisor, emphasizing real-world performance, system compatibility, and safety-first practices across trail riding, utility use, and off-road exploration.
