Wiring an ATV winch is not complicated, but it does need to be done in the right order. Most issues don’t come from the winch itself—they stem from small wiring mistakes that only show up under load.
If you understand the basic flow—battery power, solenoid control, and switch activation—you can wire it safely without guessing or resorting to trial and error.
Jump To Contents
- How to wire an ATV winch (quick steps):
- What You’re Actually Wiring (Before You Start)
- How Power Actually Flows
- Tools and Parts You’ll Need
- Step-by-Step: Wiring an ATV Winch
- Step 1 — Mount the Winch and Solenoid Properly
- Step 2 — Connect Winch Cables to the Solenoid
- Step 3 — Connect Solenoid to the Battery (Power Lines)
- Step 4 — Handle Grounding the Right Way
- Step 5 — Install and Wire the Handlebar Switch
- Step 6 — Final Check Before Powering Up
- Step 7 — Test the Winch (Controlled Test)
- Common Wiring Mistakes That Kill Your Winch – Rewritten for Flow
- Real-World Scenario: Wiring That Actually Survives the Trail
- Wiring That Actually Holds Up Outside the Garage
- What Changes Once You’re Riding
- Where Most Trail Failures Start
- How to Wire for Real Conditions
- What a Good Install Feels Like Later
- Do You Really Need a Solenoid? – Myth vs Reality
- The Myth: “You Can Wire It Straight to the Battery”
- The Reality: The Solenoid Is the Control Center
- What Happens If You Skip It
- Bottom Line
- Troubleshooting After Wiring
- Safety Checklist Before First Use
- FAQs — Wiring an ATV Winch
- Do I need a solenoid to wire an ATV winch?
- Can I wire an ATV winch directly to the battery?
- What size wire is needed for an ATV winch?
- Why is my ATV winch not working after wiring?
- Does polarity matter when wiring an ATV winch?
- Where should the solenoid be mounted on an ATV winch setup?
- How do I test an ATV winch after wiring?
- Final Thoughts
How to wire an ATV winch (quick steps):
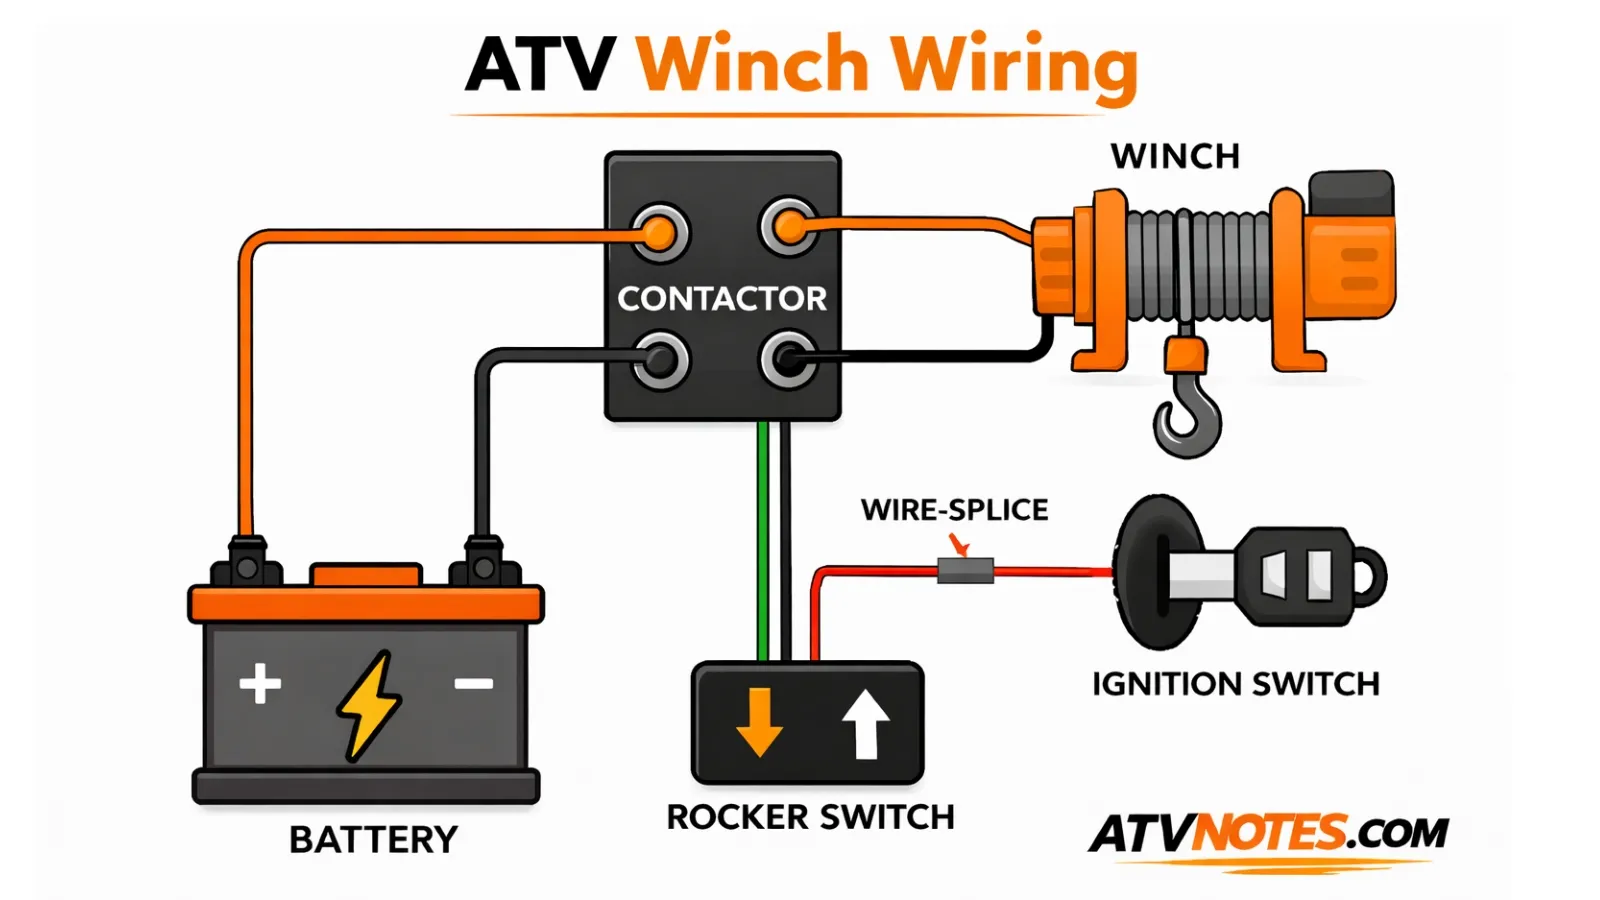
To wire an ATV winch:
- Mount the winch and solenoid securely.
- Connect the winch cables to the solenoid.
- Run power cables from the solenoid to the battery.
- Ground the system properly.
- Install the handlebar switch and connect it to the solenoid.
- Test both directions before use.
That’s the full wiring path in order: battery → solenoid → winch → switch control.
If any part of that chain is wrong, the system either won’t respond properly or it fails under load. However, this is just one part of a larger setup—understanding how the full recovery system comes together makes a big difference when you’re actually relying on it in real conditions.
Now, before going into steps, it helps to understand what each part is actually doing in the system.
What You’re Actually Wiring (Before You Start)
An ATV winch isn’t wired directly to the battery like a light or accessory. It’s a high-current system controlled through a relay (solenoid).
Here’s how the system actually works:
- Battery → supplies raw power
- Solenoid (relay) → controls and redirects that power
- Winch motor → converts power into pulling force.
- Handlebar switch → tells the solenoid when and which direction to run.
Think of the solenoid as a gatekeeper. It takes a small signal from your switch and safely controls a large surge of power going to the winch.
Without it, you’d be forcing full battery current through a tiny switch, which leads to overheating, failure, or worse.
How Power Actually Flows
This is where most confusion happens.
- The battery feeds power into the solenoid.
- The solenoid sends power to the winch (in or out)
- The switch only triggers the solenoid—it doesn’t power the winch
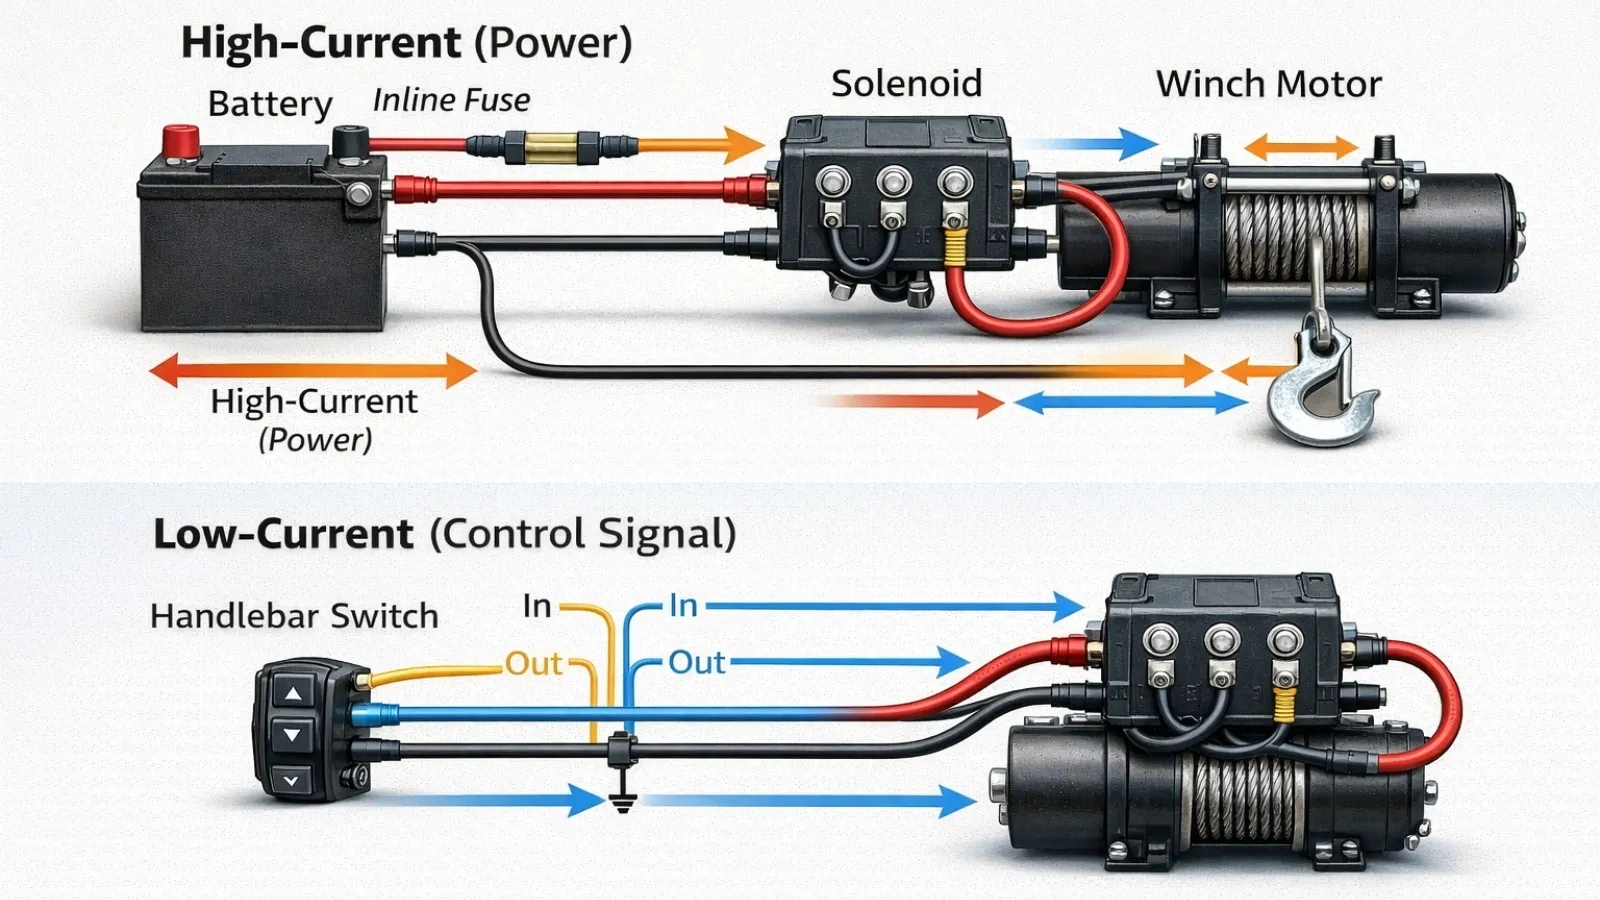
That’s why your wiring has two circuits:
- A high-current circuit (battery ↔ solenoid ↔ winch)
- A low-current control circuit (switch ↔ solenoid)
Mix these up, and the system won’t behave correctly.
Tools and Parts You’ll Need
Before you start, make sure you’re not improvising mid-install. Most wiring problems come from missing the small stuff—not the big components.
Core Parts (Don’t Skip These)
- Winch wiring kit (usually includes cables, solenoid, and switch)
- ATV battery – fully charged and in good condition (ATV battery guide for winch performance)
- Circuit breaker or inline fuse (if not pre-installed in the kit).
If your winch didn’t come with a proper wiring kit, stop there and get one(). Piecing it together with random cables usually leads to a voltage drop or overheating.
Basic Tools
- Socket set or wrench (for battery terminals and mounting bolts)
- Screwdrivers (flathead and Phillips)
- Pliers or wire crimper (for secure connections)
Nothing fancy—but solid tools make tighter, safer connections.
Small Extras That Make a Big Difference
- Heat shrink tubing or electrical tape (for insulation)
- Zip ties (for clean, secure cable routing)
- Dielectric grease (protects terminals from corrosion)
These are the differences between a clean install and one that fails after a few muddy rides.
Quick Reality Check
If your cables feel thin, connectors look cheap, or terminals don’t tighten properly, fix that before you install.
A winch pulls a serious current. Weak wiring doesn’t just reduce performance—it creates heat, resistance, and long-term failure points.
Step-by-Step: Wiring an ATV Winch
This isn’t just about connecting wires—it’s about doing it in the right order so nothing gets crossed, stressed, or shorted.
Follow this flow. It mirrors how a clean install actually happens.
Dive in: Find the right mount for your ATV winch
Step 1 — Mount the Winch and Solenoid Properly
Start with solid placement before touching any wiring.
- Mount the winch to the ATV frame using the provided plate.
- Position the solenoid close to the battery, away from water and heat.
- Make sure both are firmly secured.
If these components move, your wiring will loosen over time. That’s how failures start.
Step 2 — Connect Winch Cables to the Solenoid
Now connect the winch to its control unit.
- Identify the two cables coming from the winch motor.
- Attach them to the matching terminals on the solenoid.
- Follow color coding or labels (usually yellow/blue or similar)
These connections control direction. If swapped, your “in” and “out” will reverse—not dangerous, but confusing.
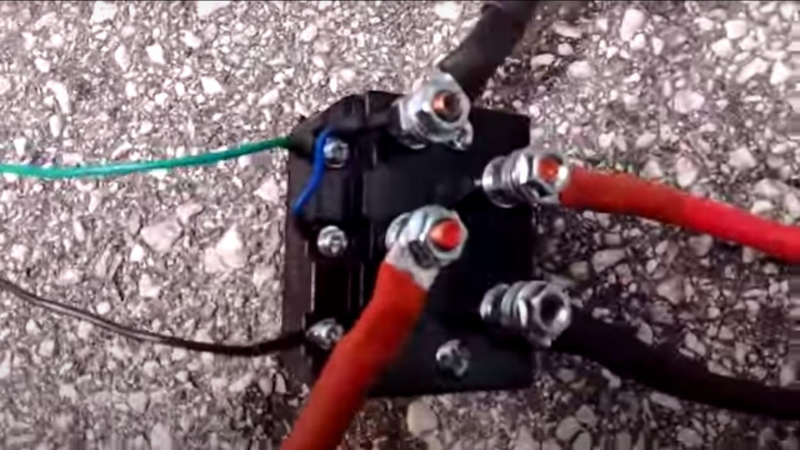
Step 3 — Connect Solenoid to the Battery (Power Lines)
This is your main power feed.
- Run the positive (red) cable from the solenoid to the battery positive (+)
- Run the negative (black) cable from the solenoid to the battery negative (–)
Keep cables:
- As short as practical
- Away from sharp edges
- Clear of engine heat
Long or poorly routed cables = voltage loss and wear.
Step 4 — Handle Grounding the Right Way
This is where most installs quietly fail.
You have two solid options:
- Direct ground: Connect to battery negative (best and most reliable)
- Frame ground: Only if it’s clean, bare metal, and tightly secured
Paint, rust, or loose bolts kill grounding quality.
A bad ground won’t always stop the winch—but it will make it weak, inconsistent, or unreliable under load.
Step 5 — Install and Wire the Handlebar Switch
Now you connect control, not power.
- Mount the switch where it’s easy to reach without shifting grip.
- Run the control wires along the frame toward the solenoid.
- Plug them into the designated solenoid terminals.
Secure the wiring:
- Use zip ties
- Keep it away from steering movement and suspension travel.
Pinched or stretched wires here = intermittent control issues.
Step 6 — Final Check Before Powering Up
Before connecting the battery fully or testing:
- Confirm all terminals are tight.
- Check polarity (positive to positive, negative to negative)
- Make sure no wires are exposed or rubbing metal.
- Verify cables aren’t near hot engine parts.
This step prevents instant mistakes.
Step 7 — Test the Winch (Controlled Test)
Now test it—don’t skip this.
- Turn the ATV on (recommended for stable voltage)
- Press the switch to spool in
- Press again to spool out.
Watch for:
- Smooth operation
- No hesitation
- No unusual clicking or heat
If something feels off, stop and recheck wiring before using it under load.
Common Wiring Mistakes That Kill Your Winch – Rewritten for Flow
Most winch problems don’t show up when you finish wiring—they show up the first time you actually need it.
Under load, small mistakes turn into real failures. Here’s where things usually go wrong.
Common ATV winch wiring mistakes:
- Reversed polarity
- Weak or dirty ground
- Loose connections
- Skipping the solenoid
- Poor cable routing
- Undersized wiring
- No circuit protection
Reversed Polarity
This is the fastest way to break something.
If positive and negative are swapped, the system can spark, short, or damage the solenoid. Sometimes it won’t fail immediately, which makes it worse. It gives you a false sense that everything’s fine.
The fix is simple: trace every cable before tightening. Don’t trust color alone if anything looks off.
Weak or Dirty Ground
A bad ground doesn’t always stop the winch—it just makes it unreliable.
You’ll notice it when the winch slows down, struggles under load, or works one moment and not the next. Most of the time, the issue is grounded in painted metal, rust, or a loose bolt.
The cleanest solution is going straight to the battery negative. If you use the frame, it has to be bare metal and solid.
Loose Connections
This one is easy to overlook because everything looks connected.
But a slightly loose terminal creates resistance. Resistance creates heat. And heat eventually damages wires and connectors.
Tighten everything properly. Not just “snug”—secure.
Skipping the Solenoid
It’s tempting to simplify the setup and wire directly to the battery. That shortcut doesn’t hold up.
Without a solenoid, you’re pushing full current through a system that isn’t designed to handle it. Control becomes unreliable, and components wear out faster.
The solenoid isn’t extra—it’s what makes the system safe and functional.
Bad Cable Routing
This mistake takes time to show up.
At first, everything works. Then the wires start rubbing, heating up, or getting pinched. Eventually, insulation wears down, and problems start.
Clean routing matters more than people think. Keep cables away from sharp edges, heat, and moving parts. Secure them so they stay put.
Undersized or Cheap Wiring
A winch pulls a serious current. Thin or low-quality wires can’t keep up.
The result is slower performance, more heat, and long-term damage to the system. It might work—but never as well as it should.
If the wiring looks weak, it probably is.
No Circuit Protection
This is one of those things you don’t notice—until something goes wrong.
Without a fuse or circuit breaker, a short circuit can damage more than just the winch. It can affect the battery and the rest of the system. It’s a small addition that prevents bigger problems.
Reminder: ensure you have the right size fuse for the winch.
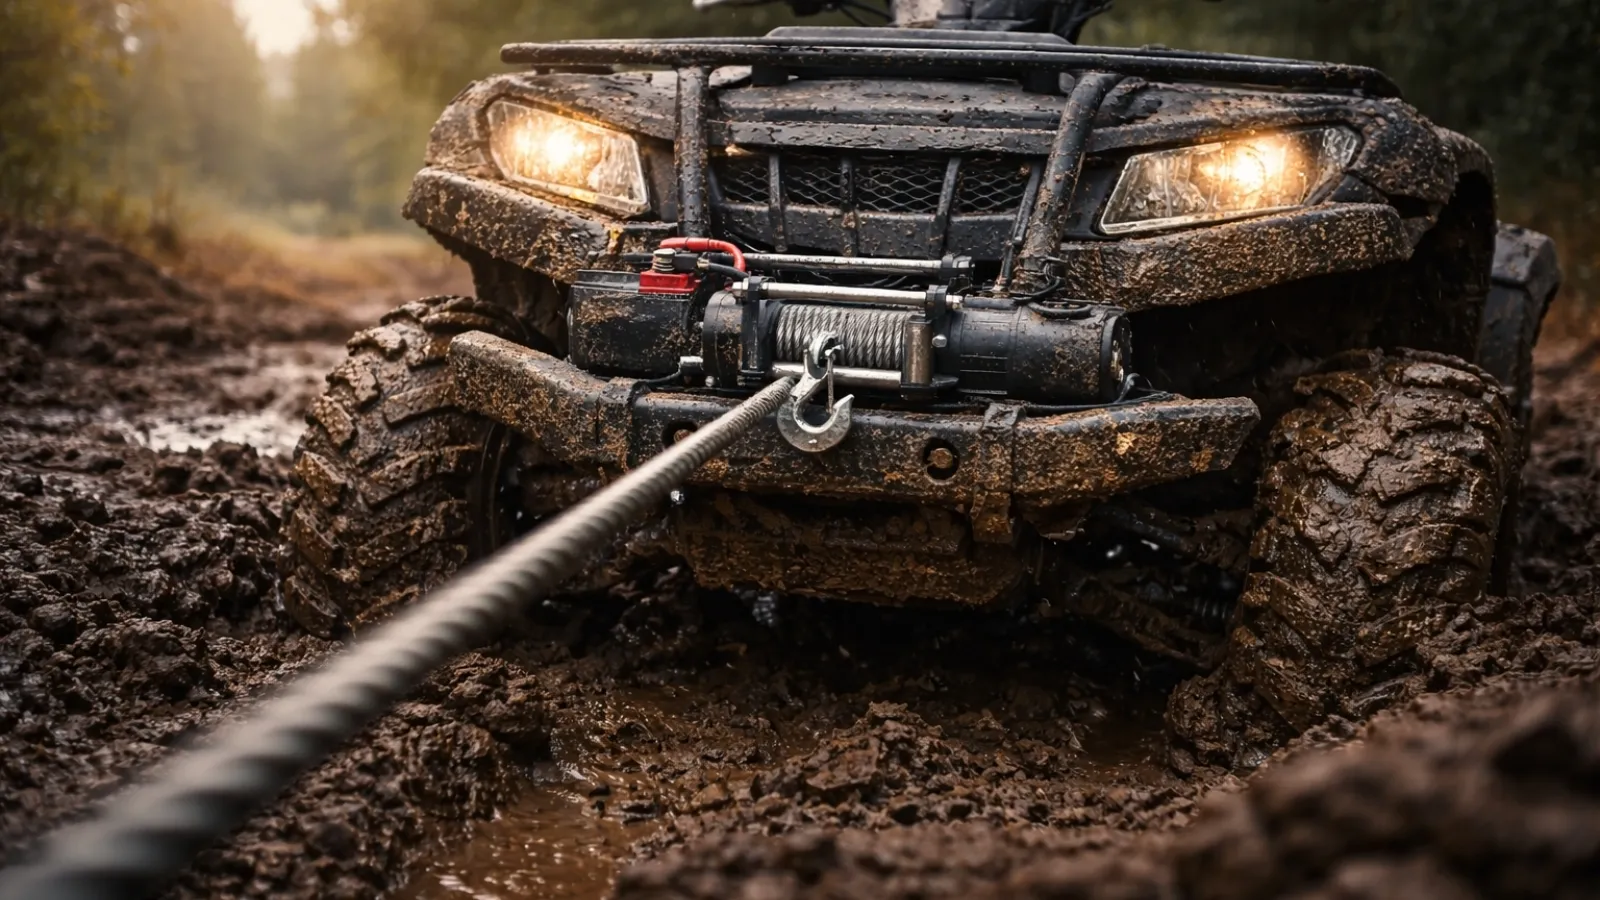
Real-World Scenario: Wiring That Actually Survives the Trail
Wiring That Actually Holds Up Outside the Garage
A clean install in your garage doesn’t mean much if it fails on the trail.
Out there, your winch wiring deals with things your setup never saw during install—water crossings, constant vibration, heat buildup, and sudden pulls under load. That’s where weak routing and exposed connections start to show.
What Changes Once You’re Riding
On the trail, your wiring is constantly moving and being stressed.
- The frame flexes more than you think.
- Mud and water find their way into small gaps.
- Engine heat slowly affects nearby cables.
- Vibration works on every connection over time.
Nothing fails instantly. It builds up.
Where Most Trail Failures Start
The failure points are usually predictable.
Wires routed too close to sharp edges begin to wear down. On the other hand, cables hanging loose start rubbing or getting pinched. And connections that weren’t fully sealed begin to corrode after a few wet rides.
Everything looks fine—until the winch suddenly cuts out when you need it.
How to Wire for Real Conditions
A trail-ready setup isn’t complicated—it’s just more intentional.
Keep your cables tight to the frame so they don’t move around. And avoid routing near the exhaust or engine where heat builds up. Stay alert while using zip ties; don’t overtighten them to the point of stressing the wire.
At connection points, a small amount of dielectric grease helps keep moisture out. It’s a simple step that makes a big difference over time.
What a Good Install Feels Like Later
After a few rides, a properly wired system should still feel the same:
- No delay when you hit the switch
- No drop in power under load
- No intermittent behavior
If performance changes after a few outings, it’s almost always a wiring issue—not the winch itself.
Why This Section Matters
Most guides stop at installation. That’s not where real problems happen.
This is the difference between:
- a setup that works once
- and one that works when you’re stuck and actually need it
Dive in: Pick the right solenoid for your winch
Do You Really Need a Solenoid? – Myth vs Reality
Short answer: yes—you do.
But the confusion usually comes from seeing how simple the system looks. A winch, a battery, a couple of wires… it feels like you could just connect everything directly and skip the extra component.
That’s where things go wrong.
The Myth: “You Can Wire It Straight to the Battery”
Technically, you can run power straight from the battery to the winch.
But here’s what that actually means in practice:
- Full battery current has nowhere to be controlled.
- Your switch isn’t designed to handle that load.
- There’s no safe way to manage direction (in/out)
So while it might seem like a shortcut, it removes the very thing that makes the system usable and safe.
The Reality: The Solenoid Is the Control Center
The solenoid does two critical jobs at once:
- It handles high current safely without overloading smaller components.
- It controls direction, allowing the winch to spool in and out.
More importantly, it separates control from power.
Your handlebar switch sends a small signal. The solenoid responds by opening or closing the high-current circuit.
That separation is what protects the system.
What Happens If You Skip It
This is where most “shortcut” installs fail.
Without a solenoid:
- Switches overheat or burn out.
- Wiring takes on more load than it should
- Control becomes unreliable or inconsistent.
In some cases, the winch may still run—but not in a way you can depend on.
Bottom Line
The solenoid isn’t an extra part—it’s what makes the entire setup work properly.
If your goal is a winch that responds when you need it, holds up under load, and doesn’t damage your electrical system, the solenoid stays.
Dive in: Full ATV winch troubleshooting guide
Troubleshooting After Wiring
If your winch isn’t working right after installation, don’t assume the unit is faulty.
Most issues come down to wiring—and they follow predictable patterns.
The key is to match the symptom with the likely cause instead of guessing.
Winch Doesn’t Respond at All
No sound, no movement—completely dead.
Start with the basics:
- Check battery terminals (tight and connected). (ATV battery testing guide is a great help here)
- Make sure the main power cables are properly attached to the solenoid.
- Verify the switch is connected and not damaged.
If everything looks fine, trace the circuit from battery → solenoid → switch.
Somewhere along that path, power isn’t getting through. In this case, you need to check the winch solenoid to be sure if there is an issue.
You Hear a Click, But Nothing Happens
This usually means the solenoid is working—but the winch isn’t getting enough power.
Common causes:
- Weak or low battery
- Loose or corroded connections
- Poor grounding
The click is a good sign. It tells you the control circuit is fine. The problem is in the power delivery.
Winch Runs, But It’s Weak or Slow
This is almost always a resistance issue.
What to check:
- Ground connection (most common cause)
- Cable thickness and quality
- Loose terminals create a voltage drop
A winch under load needs full current. Any restriction shows up as slow or struggling movement.
Winch Works in One Direction Only
If it spools in but not out (or vice versa), the issue is usually at the solenoid or switch.
Check:
- Control wires connected to the solenoid.
- Switch wiring or internal fault.
- Terminal connections for direction control
This isn’t a motor problem—it’s a control signal issue.
Intermittent Operation (Works, Then Doesn’t)
This is the most frustrating type.
It usually points to:
- Loose wiring
- Wires are getting pinched or stretched.
- Connections affected by vibration
If it works sometimes and fails other times, something is moving that shouldn’t.
A Simple Way to Think About It
Every winch issue falls into one of two categories:
- No power reaching the system
- Power is not flowing properly under load.
If you keep that in mind, troubleshooting becomes much easier.
Safety Checklist Before First Use
Before you test the winch under real load, do one final system inspection. This is the point where you verify the electrical integrity, mechanical routing, and control response – the three things that determine whether the setup will survive real trail use.
Electrical Integrity (Power Path Check)
Start with the high-current circuit (battery → solenoid → winch motor).
Battery terminals and solenoid connections should be fully tightened and stable, not just loosely seated. Look closely for anything that breaks continuity – exposed copper, partially crimped terminals, or connectors that don’t feel firmly locked in place. These are the small resistance points that later turn into heat or power loss under load.
Wiring Routing (Mechanical Stress Control)
Next, follow the physical cable routing path along the ATV frame.
Wires should sit naturally without tension or strain. Pay attention to areas where the harness passes near sharp edges, suspension movement zones, or engine heat zones. These are the stress points where insulation damage typically starts long before a failure becomes visible.
A clean routing path here is less about appearance and more about preventing vibration wear and long-term insulation breakdown.
Control Circuit (Switch Response Check)
Now test the low-current control circuit (handlebar switch → solenoid trigger).
The switch should activate the solenoid instantly in both directions without hesitation or flickering. Any delay or inconsistent response usually points to a loose control connection rather than a winch motor issue.
This is the part of the system that tells the solenoid what to do—if it’s unstable, everything downstream becomes unreliable.
Power Readiness (Load Capacity Check)
Finally, verify the battery condition and current supply capability.
A winch demands high current, especially under load. Even a slightly weak battery can mimic wiring problems by causing sluggish response or intermittent operation. Ensure the battery is fully charged and the terminals are clean and corrosion-free so current flow remains consistent. Check our guide on how to charge an ATV battery with a charger and without it.
System Readiness (Overall Function Check)
If all three layers—power path, routing stability, and control response—are functioning cleanly during a no-load test, the system is ready for real-world operation.
At this point, the winch should feel predictable: immediate response, smooth direction change, and no abnormal noise or hesitation.
FAQs — Wiring an ATV Winch
Do I need a solenoid to wire an ATV winch?
Yes. A solenoid is required because it safely controls high current flow from the battery to the winch and allows directional control (in and out). Without it, the switch and wiring can overheat or fail.
Can I wire an ATV winch directly to the battery?
Technically, you can, but it is not safe or recommended. Direct wiring removes proper current control and can damage the switch, wiring, or winch motor under load.
What size wire is needed for an ATV winch?
Most ATV winches require heavy-gauge wire, typically around 6 AWG to 8 AWG, depending on winch size. Using a thinner wire can cause voltage drop, heat buildup, and poor performance.
Why is my ATV winch not working after wiring?
The most common causes are loose battery connections, poor grounding, incorrect solenoid wiring, or a weak battery. Start by checking the power flow from the battery to the solenoid and winch.
Does polarity matter when wiring an ATV winch?
Yes. Reversing polarity can cause the winch to run incorrectly or potentially damage the solenoid or motor. Always match positive and negative connections carefully before testing.
Where should the solenoid be mounted on an ATV winch setup?
The solenoid should be mounted in a dry, secure location close to the battery. It should be protected from water, mud, and excessive vibration for reliable operation.
How do I test an ATV winch after wiring?
Turn on the ATV, then use the handlebar switch to test both “in” and “out” directions. The winch should respond immediately without delay, noise issues, or power hesitation.
Final Thoughts
Wiring an ATV winch isn’t difficult once you understand the system—but it stops being simple the moment shortcuts enter the process.
At its core, the setup is just three things working together – power delivery from the battery, controlled switching through the solenoid, and a stable control signal from the handlebar switch. When those three layers are clean and properly connected, the winch becomes predictable. And predictability is what matters when the ATV is stuck under load.
Most failures don’t come from complex problems. They come from small decisions made during installation—loose terminals, weak grounding, rushed routing, or skipping protection components. None of these looks serious at first, but they show up exactly when the system is under stress.
If there’s one thing to take from the whole process, it’s this: a winch doesn’t need to be over-engineered, but it does need to be wired with discipline. Clean connections, proper grounding, and careful routing are what separate a setup that works in theory from one that works in the field.
Once everything is installed correctly, the winch stops being something you worry about. It becomes something you trust—quietly, consistently, and without hesitation when you actually need it.
Continue exploring related topics:
- Winching mistake to avoid and unstuck your machine safely
- Learn how to wire and mount a winch on your UTV
- Top-rated ATV winches to go for in 2026

ATVNotes is an off-road resource focused on ATV and UTV winching, recovery systems, safety gear, tires, batteries, and essential off-road equipment. Content is produced by the ATVNotes Expert Team and written from the perspective of a practical off-road recovery advisor, emphasizing real-world performance, system compatibility, and safety-first practices across trail riding, utility use, and off-road exploration.