Let’s face it—nothing kills the thrill of a ride faster than a helmet that squeezes your skull or flops around like a loose tooth. Putting on an ATV helmet might seem simple, but do it wrong, and you’re setting yourself up for discomfort, distraction, or even danger.
This guide isn’t just about strapping on some headgear. It’s about getting that perfect fit—one that feels like part of you and not a medieval torture device.
Read: How to Mount GoPro on ATV Helmet? – Explore 5 Different Options
Jump To Contents
- Why Helmet Fit Matters
- Determine the Right Helmet Size & Shape
- Prepare for a Comfortable Fit (Break-in Style)
- How to Put On the ATV Helmet in 6 Simple Steps
- Long-Term Fit: Maintenance & Fit Evolution
- FAQs on Putting On ATV Helmet Correctly
- 1. How do I know if my helmet is the right shape for my head?
- 2. Can kids wear adult-sized helmets if they fit snugly?
- 3. Do different ATV helmet brands fit differently?
- 4. Does helmet type matter for its fit?
- 5. Should I size up if I plan to wear a winter balaclava or hood?
- 6. What’s the difference between a snug fit and a pressure point?
- 7. Can a helmet that fits perfectly still be uncomfortable after an hour?
- Comfort Is the New Cool
Why Helmet Fit Matters
Before we even touch the helmet, let’s get one thing straight—fit is everything. You wouldn’t wear shoes that pinch your toes or fall off with every step, right?
Same goes for your helmet. A bad fit can:
- Cause tension headaches or neck fatigue
- Distract you during rides
- Reduce protection in the event of a crash
Think of your helmet as a second skull. It needs to be snug—but not suffocating. Solid—but not stiff. The right fit makes you feel confident and locked in, not claustrophobic.
Determine the Right Helmet Size & Shape
The key to putting on your helmet properly is starting with one that actually fits your head.
But how do you know what’s right?
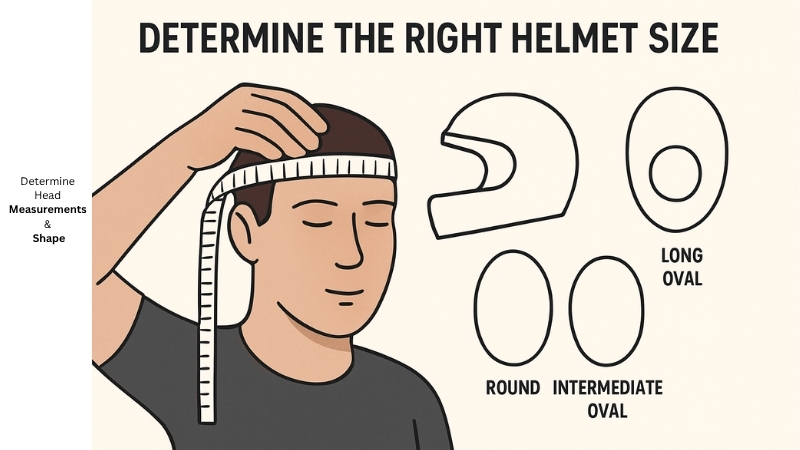
- Measure your head with a flexible tape—just above your eyebrows and around the widest part.
- Compare it to the helmet sizing chart (each brand’s chart is a bit different). See our ATV helmet size guide for in-depth exposure on this.
- Know your head shape—some are round, others are oval. Choose your helmet accordingly.
Quick tip: If it presses your forehead or feels like it’s squeezing your temples, it’s too small. If it wobbles when you shake your head, it’s too big.
Finding the right helmet size is a lot like picking out leather boots. Get it wrong, and every step (or ride) becomes a chore.
Read: Why and How to Wear Goggles with ATV Helmet – The Ultimate Guide
Prepare for a Comfortable Fit (Break-in Style)
Even the right-sized helmet might feel a bit snug at first. So, that’s normal to give helmets some gentle wear time to mold perfectly to you.
Here’s how to ease into comfort:
- Wear it indoors for 15–30 minutes a day before your first real ride.
- Expect light pressure on the cheeks and crown at first—this softens with time.
- Avoid shortcuts like heating or over-bending the helmet shell.
The trick is consistency, not force. Let it naturally conform to your head.
Read: 7 Best Youth ATV Helmets Reviewed for 2025 & Beyond
How to Put On the ATV Helmet in 6 Simple Steps
Once you’ve got the right size and it’s partially broken in, it’s time to learn how to actually put the helmet on like a pro—not like someone trying to wrestle with a watermelon.
This process might seem straightforward, but small mistakes here can lead to discomfort, poor vision alignment, or even neck strain during a ride. So, let’s get it right from the start.
1. Pre-check the Helmet
You wouldn’t wear muddy boots on a clean carpet—so don’t skip the basic prep before sliding on your helmet.
- Flip up the visor, peak or shield, if your helmet has one. This avoids accidentally scratching your nose, cheeks, or the inside of the visor during the process.
- Loosen the chin strap completely so you don’t yank or tug the helmet unnecessarily. This gives you maximum flexibility when putting it on.
- Inspect the liner and cheek pads for moisture or dirt. A damp liner from a previous ride can feel cold, slippery, and miserable—not a good start to your day.
- Make sure the helmet isn’t cold-soaked. If it’s been in a cold garage, bring it to room temp first. Cold padding is stiff and won’t mold to your face as easily.
2. Don It Properly
This isn’t a baseball cap—you don’t just slap it on. There’s a technique to getting a snug, even fit without straining your ears or smacking your nose.
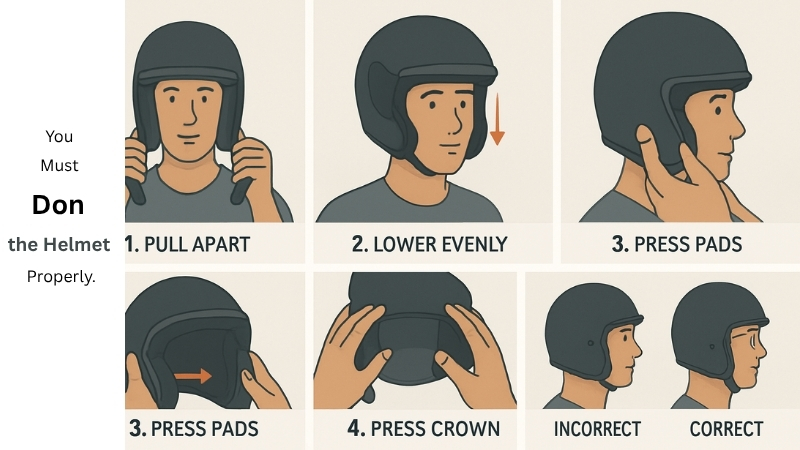
- Grab the helmet firmly by the chin straps or the base of the shell, spreading it slightly apart using your hands.
- Pull the sides apart and lower the helmet evenly onto your head from above. Don’t rush it—drop it down in one smooth motion.
- Avoid tilting it back or forward too much. A steep angle can catch your ears or cause the liner to fold awkwardly inside, which will press against your scalp later on.
- If the cheek pads feel like they’re folding inward, gently press them flat with your thumbs as you lower the helmet.
- Once on, lightly press on the crown to ensure the helmet is seated evenly and flush with your skull—not floating, tilted, or cocked sideways.
Pro tip: A snug fit will require a little push—but never so much that it hurts. The goal is secure, not suffocating.
3. Check Internal Alignment
Now that it’s on your head, you need to make sure everything inside is sitting just right. A misaligned helmet leads to more than discomfort—it can mess with your peripheral vision, airflow, and overall ride confidence.
- Check the vertical angle—your helmet should sit level, with the brow just above your eyebrows. Too low = blocked vision. Too high = exposed forehead.
- Feel the cheek pads—they should be pressing in slightly, but not digging into your jaw or pushing your lips inward.
- Open and close your mouth—if you feel like you’re biting the pads or can’t move your jaw freely, it’s too tight or misaligned.
- Tilt your head side to side and front to back—make sure there’s no pinching or rocking feeling, which could indicate uneven pressure points.
A good helmet feels like a firm, balanced hug—nothing loose, nothing aggressive.
4. Securing the Chin Strap
Don’t even think about rolling out without securing your chin strap. It’s the only thing that keeps the helmet from flying off in an impact—or even just on a bumpy trail.
The chin strap isn’t just for safety; it plays a key role in keeping the helmet aligned and balanced on your head. A loose strap can lead to slippage mid-ride or vibrations that cause neck fatigue.
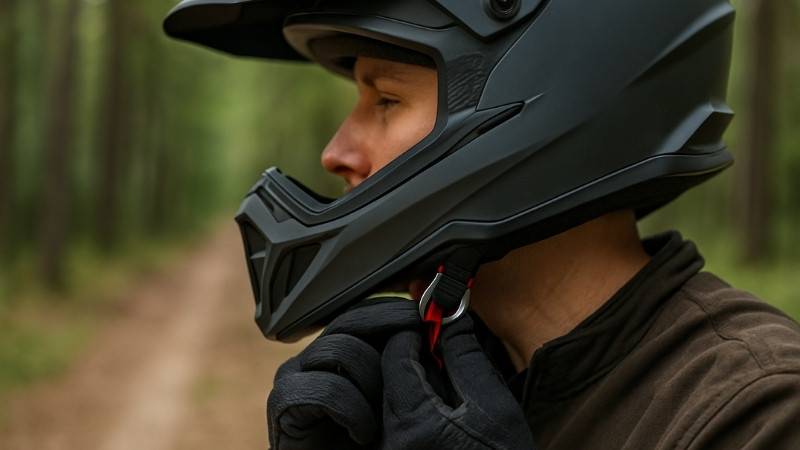
Here’s how to do it right:
- If your helmet uses a Double D-ring system:
- Thread the strap through both metal rings.
- Loop it back over the first ring and pull it tight until snug under your jawline.
- Make sure the tail of the strap is secured through the elastic loop or snap tab provided.
- If it’s a quick-release buckle:
- Slide the male end into the female buckle until you hear a click.
- Tug gently to ensure it’s locked in place and not partially clipped.
- Double-check that the release tab isn’t obstructed, in case you need to take it off quickly.
- Fit test:
- Slide two fingers between your chin and the strap.
- If you can’t squeeze them in, loosen slightly.
- If you can fit three or more fingers, it’s too loose—tighten it up.
Never ride with a half-buckled strap—it’s worse than none at all.
5. Checking Fit & Comfort
Before you hit the trail, you’ve got one final check. This is where we see if the helmet is ride-ready—or if it’s going to turn into a head vise in 30 minutes.
Think of this like walking around the house in new boots to see if you’ll blister in them. You’re looking for signs of discomfort now, before you’re 10 miles deep on a muddy trail.
Run these tests:
- Nod “yes” and shake “no”: The helmet should move your scalp—not slide around. If it shifts independently, it’s too big.
- Check pressure points: Notice any sharp or focused pressure on your forehead, temples, or the back of your skull? That’s a sign it’s either misaligned or the wrong shape.
- Cheek squeeze test: Can you open and close your jaw comfortably? Your cheeks should puff out slightly but not get pinched.
- Wear it for 15–30 minutes indoors: You’ll feel issues creep up—itchiness, tightness, or heat build-up you might not notice at first.
- Try with riding gear: If you wear a balaclava, neck gaiter, or goggles, test the helmet with them now. Sometimes that thin layer is all it takes to shift the feel from perfect to pinchy.
If something feels off now, fix it before you ride. On the trail, small problems become big distractions.
6. Troubleshooting Common Discomfort (“Hot Spots”)
So you put it on, it passed the shake test—but now you’re feeling weird pressure on your forehead or your ears are throbbing after 20 minutes. Don’t panic. These are hot spots, and they’re totally fixable.
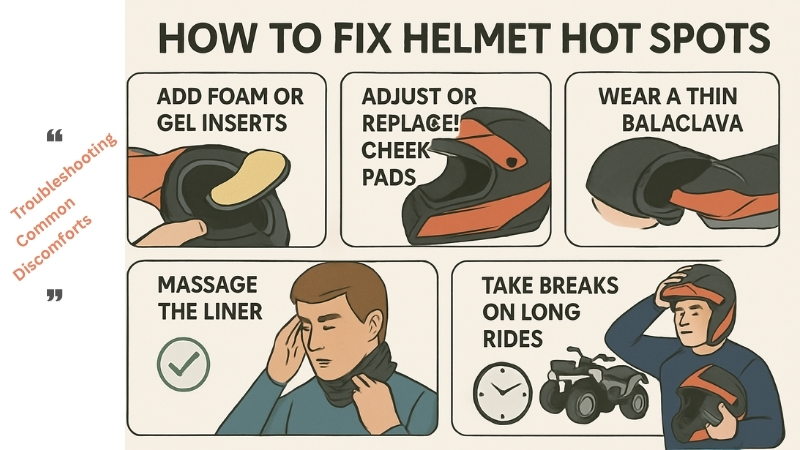
Here’s how to fix hot spots:
- Add foam or gel inserts: These are self-adhesive pads that go inside the liner, typically around the pressure area. They add cushioning or shift the helmet away from the pain point.
- Adjust or replace cheek pads: Many helmets allow you to swap the cheek pads for thinner or thicker options. A few millimeters can make a huge difference.
- Wear a thin balaclava: This helps reduce friction, keeps sweat off the liner, and evens out pressure against your skin.
- Massage the liner: With clean hands, gently press and flex the foam where it’s pressing too hard. This helps speed up the break-in process without compromising safety.
- Take breaks during long rides: Give your head a rest every hour or so, especially during the first few weeks of wearing a new helmet.
Remember: helmets break in, just like boots. If it’s 90% perfect now, it’ll likely be 100% in a few rides.
Long-Term Fit: Maintenance & Fit Evolution
Even the best helmet doesn’t stay the same forever. Your helmet’s fit will evolve with wear and helmets have a lifespan. So regular check-ins matter.
What to expect over time:
- Padding compression: Your cheek pads and liner will flatten slightly over 15–20 hours of wear, making the helmet feel looser. If it starts shifting mid-ride, it might be time to swap in thicker padding.
- Sweat and grime buildup: Even with a balaclava, your skin oils, sunscreen, and sweat will soak into the liner. Clean it regularly to prevent odor and maintain comfort.
- Strap stretching: The chin strap may start feeling looser over time. Re-check the tightness every few rides and adjust as needed.
- Material fatigue: After about 5 years, even a helmet that looks fine may have a compromised shell or padding. And if it’s ever taken a hard impact—replace it immediately. No exceptions.
Helmet fit isn’t one-and-done—it’s a relationship. Pay attention, make small adjustments, and know when to say goodbye.
FAQs on Putting On ATV Helmet Correctly
1. How do I know if my helmet is the right shape for my head?
Helmet shape matters just as much as size—common types are round, intermediate oval, and long oval. If your helmet fits around the crown but creates painful pressure on your forehead or sides, it’s likely the wrong shape. Try different brands, as each tends to favor a specific head shape.
2. Can kids wear adult-sized helmets if they fit snugly?
Even if an adult helmet “fits” a child’s head snugly, it’s often too heavy and poorly balanced for their neck and shoulders. Youth helmets are designed with weight distribution and safety in mind. Always prioritize a helmet made specifically for a child’s anatomy.
3. Do different ATV helmet brands fit differently?
Yes, helmet sizing and internal shape vary between brands—what’s a perfect medium in one may be too loose or too tight in another. Some brands cater to rounder heads, others to narrow or oval ones. Always try on before buying or check return policies when ordering online.
4. Does helmet type matter for its fit?
Yes, helmet type absolutely affects its fit. Different helmet styles—like full-face, open-face, modular, or off-road—are designed with varying shapes, padding structures, and coverage levels, which impact how they sit on your head. A helmet that fits well in one style might feel too loose or tight in another, so always match the helmet type to both your head shape and intended use for optimal comfort and safety.
5. Should I size up if I plan to wear a winter balaclava or hood?
No, sizing up often leads to an unsafe fit—your helmet should still be snug even with winter gear underneath. Instead, opt for thin thermal balaclavas designed for helmet use. A properly fitted helmet with thin layers will keep you warm without compromising safety.
6. What’s the difference between a snug fit and a pressure point?
A snug fit feels firm all around and moves your scalp when you shake your head—it shouldn’t cause discomfort. Pressure points, however, are localized pain spots that feel sharp or distracting, often on the forehead or temples. Over time, pressure points can lead to headaches or long-term soreness.
7. Can a helmet that fits perfectly still be uncomfortable after an hour?
Yes, even a properly fitted helmet can feel uncomfortable during long rides due to factors like sweat, heat, or slight padding pressure. Regular breaks and occasional liner adjustments can help improve endurance comfort. Over time, your helmet should “settle” and become more tolerable for extended use.
Comfort Is the New Cool
Putting on an ATV helmet isn’t a toss-it-on-and-go kind of deal. It’s an intentional process—one that affects your comfort, confidence, and safety every time you ride.
Take your time. Learn how it fits. Break it in gently. A perfect fit helmet should feel like part of you once it’s dialed in.
Because when your helmet disappears from your mind mid-ride, that’s how you know it’s doing its job.
Relevant reads include:
ATV Helmet vs Motorcycle Helmet – Comparison of Features & Purposes
ATVNotes is an off-road resource focused on ATV and UTV winching, recovery systems, safety gear, tires, batteries, and essential off-road equipment. Content is produced by the ATVNotes Expert Team and written from the perspective of a practical off-road recovery advisor, emphasizing real-world performance, system compatibility, and safety-first practices across trail riding, utility use, and off-road exploration.