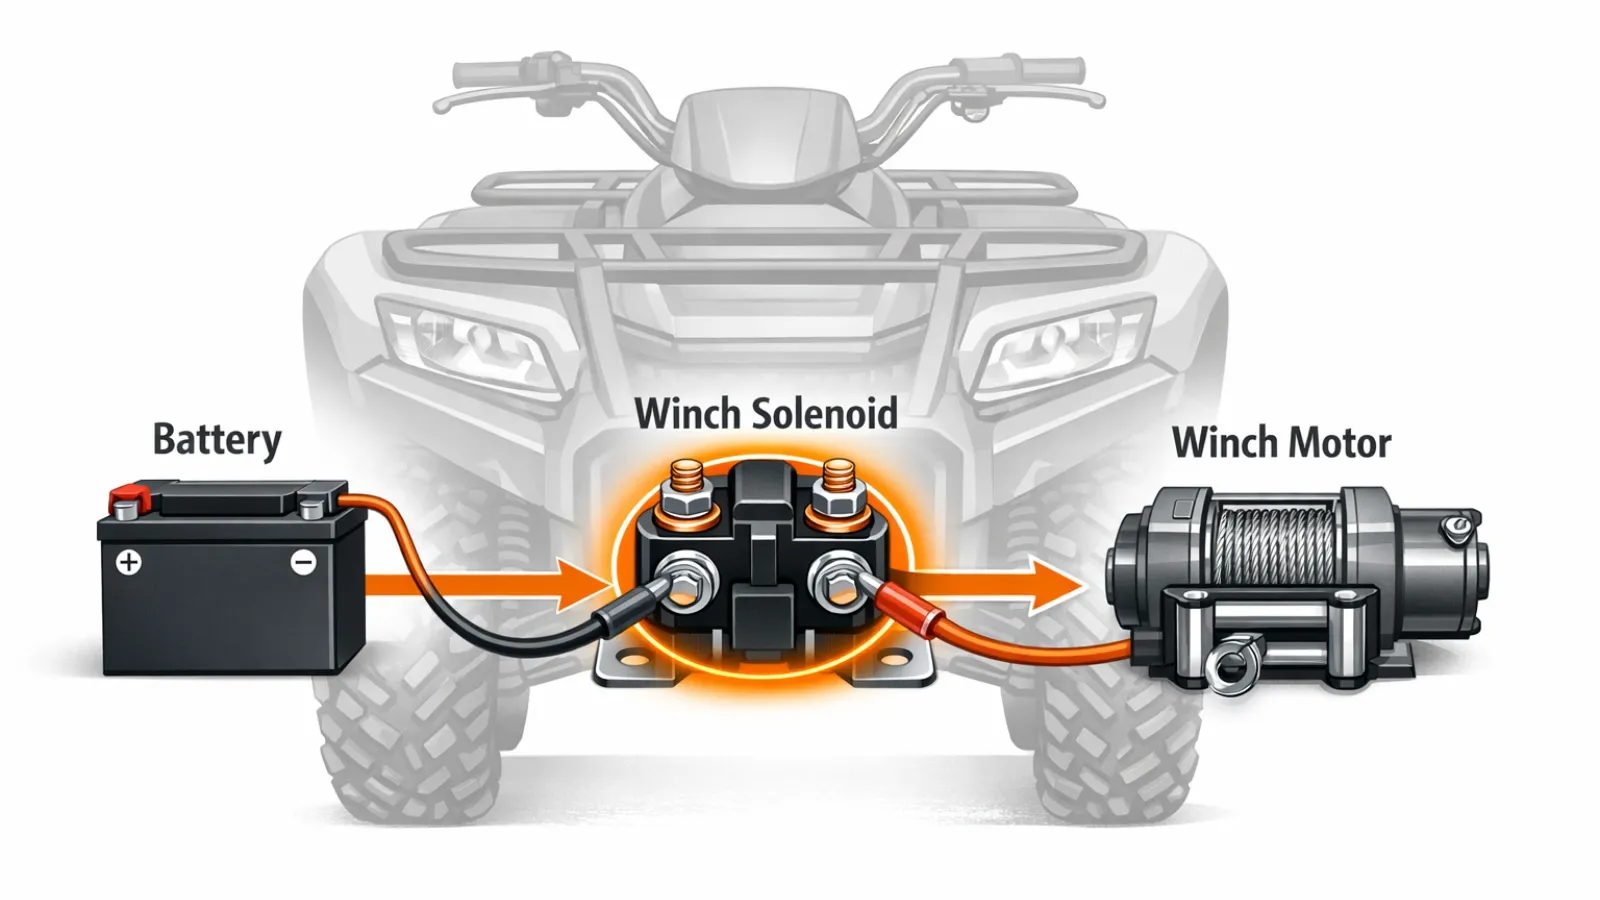
If your ATV winch clicks but won’t pull — or doesn’t respond at all — the solenoid is often the cause. This component acts as a high-amperage switch, transferring battery power to the winch motor. When it fails, current flow is interrupted and the motor won’t engage properly.
A faulty solenoid can mimic battery, wiring, or motor problems. Replacing components without proper testing can lead to misdiagnosis and unnecessary expense. Accurate testing is essential.
Quick Answer: Set your multimeter to Ohms, check continuity across the large terminals, then activate the switch and confirm full battery voltage transfers to the motor side. No continuity or no voltage transfer typically indicates a defective solenoid.
Feeling unsure where to start? This guide walks you through the process, beginning with the common symptoms of a faulty solenoid.
Jump To Contents
- Symptoms of a Bad ATV Winch Solenoid
- Tools You Need to Test Your ATV Winch Solenoid
- How to Test an ATV Winch Solenoid
- Continuity Test with Multimeter
- What Your Multimeter Reading Means
- Key Reasons Why TATV Winch Solenoid Malfunction
- How to Bypass an ATV Winch Solenoid (For Testing Only)
- FAQs
- Final Diagnosis: Is Your ATV Winch Solenoid Faulty?
Symptoms of a Bad ATV Winch Solenoid
Before grabbing your multimeter, look for these common warning signs. A failing winch solenoid usually shows clear symptoms:
- Clicking sound, but the winch doesn’t move
- No sound at all when pressing the switch
- Winch works in one direction only
- Intermittent operation
- Burning smell or visible melting
- Winch drains battery unexpectedly
Many of these symptoms overlap with broader electrical and mechanical winch issues, so evaluating the entire system can help rule out motor, battery, or switch-related faults.
Tools You Need to Test Your ATV Winch Solenoid
- A multimeter
- Jumper cables
- A.C. or D.C. power source
- Protective equipment
- Multimeter probes
How to Test an ATV Winch Solenoid
Testing is a bit tricky, but with the process broken down into the following easy steps, you need not invest in a professional service to identify the malfunction. Just understand how an ATV winch solenoid works inside the winch system. You can, for sure, do the test yourself:
Here you go:
Disconnect the Winch from the Power Source
Disconnect the winch and its power source first. The ATV’s main battery must be disconnected, too. The negative cable should be removed first, followed by the positive one. This will prevent any shock to you while testing the winch.
Locate the Solenoid
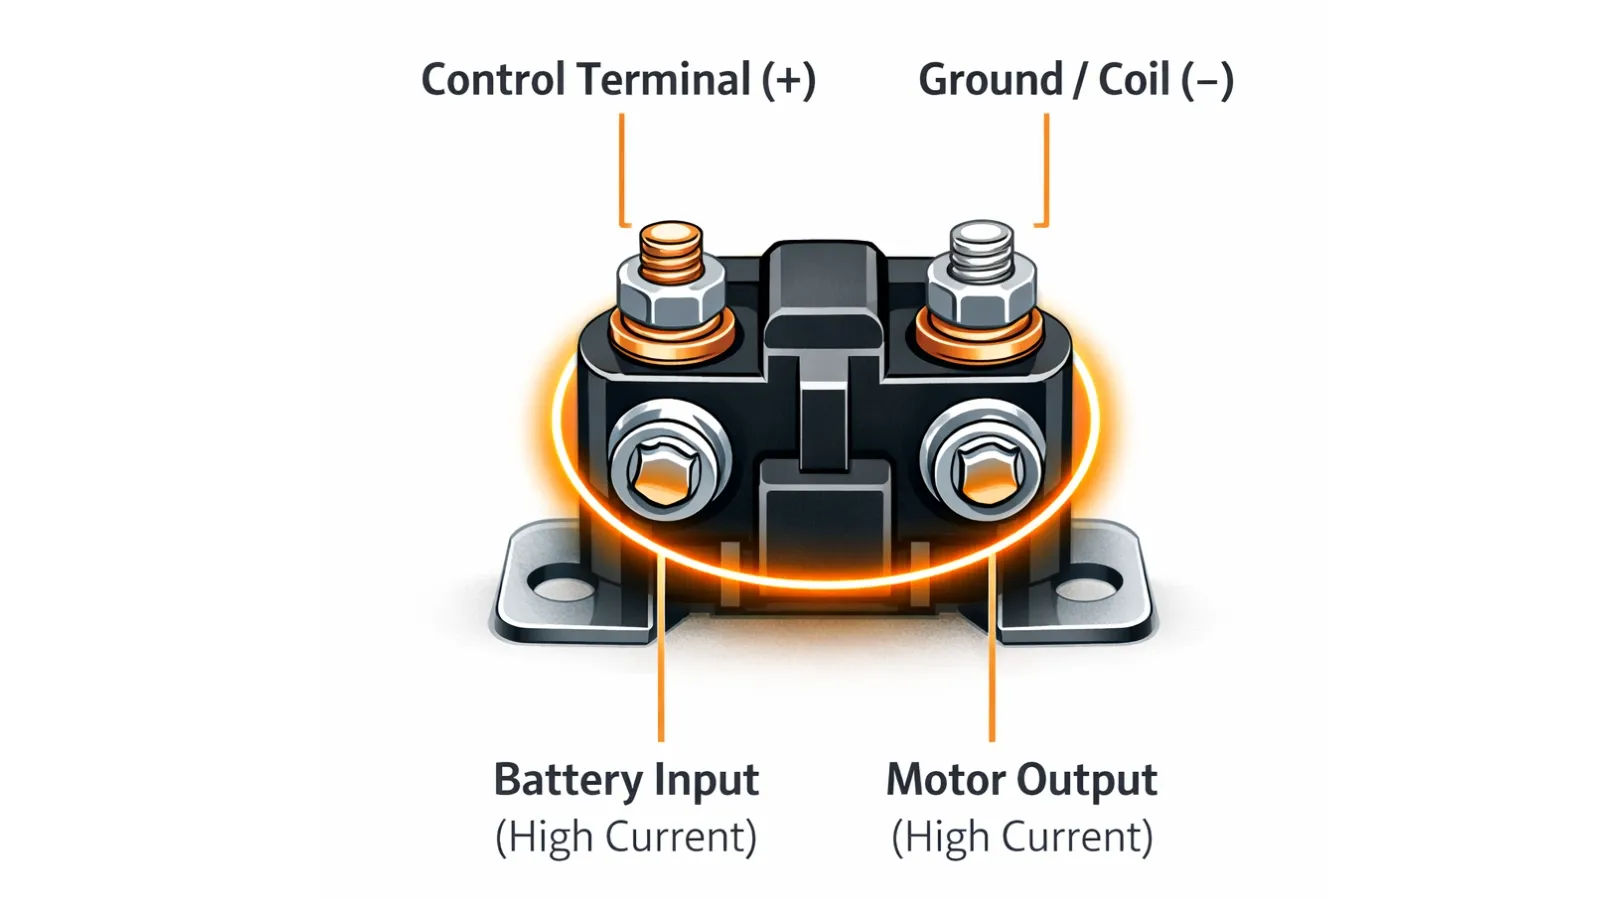
Identify the winch solenoid by visually inspecting the winch setup. The solenoid is typically a small box located near the winch motor. Refer to the winch’s manual if needed to accurately locate the solenoid.
Check for Connection Issues
Examine the connections on the solenoid for any signs of looseness or corrosion. If you find any issues, carefully clean the links and tighten them securely.
This step ensures proper electrical contact and often resolves problems caused by poor connections.
Set Your Multimeter
Take your multimeter and set it to Ohms. Take the multimeter probes and set the black probe on one of the large solenoid terminals, and place the red one on the other large solenoid.
Apply Current to the Terminals
Remember that some solenoids have three terminals, which may initially look confusing. However, you will soon realize that two of them look the same, and one looks a bit different. The ones that look the same are the terminals you will be working with.
Apply current to the solenoid (you can use a car battery for this), and if you see a low Ohm reading between 0 and 1, your solenoid is working fine.
If not, you will have to change your solenoid.
Or you can run other tests to diagnose the problem as a last resort.
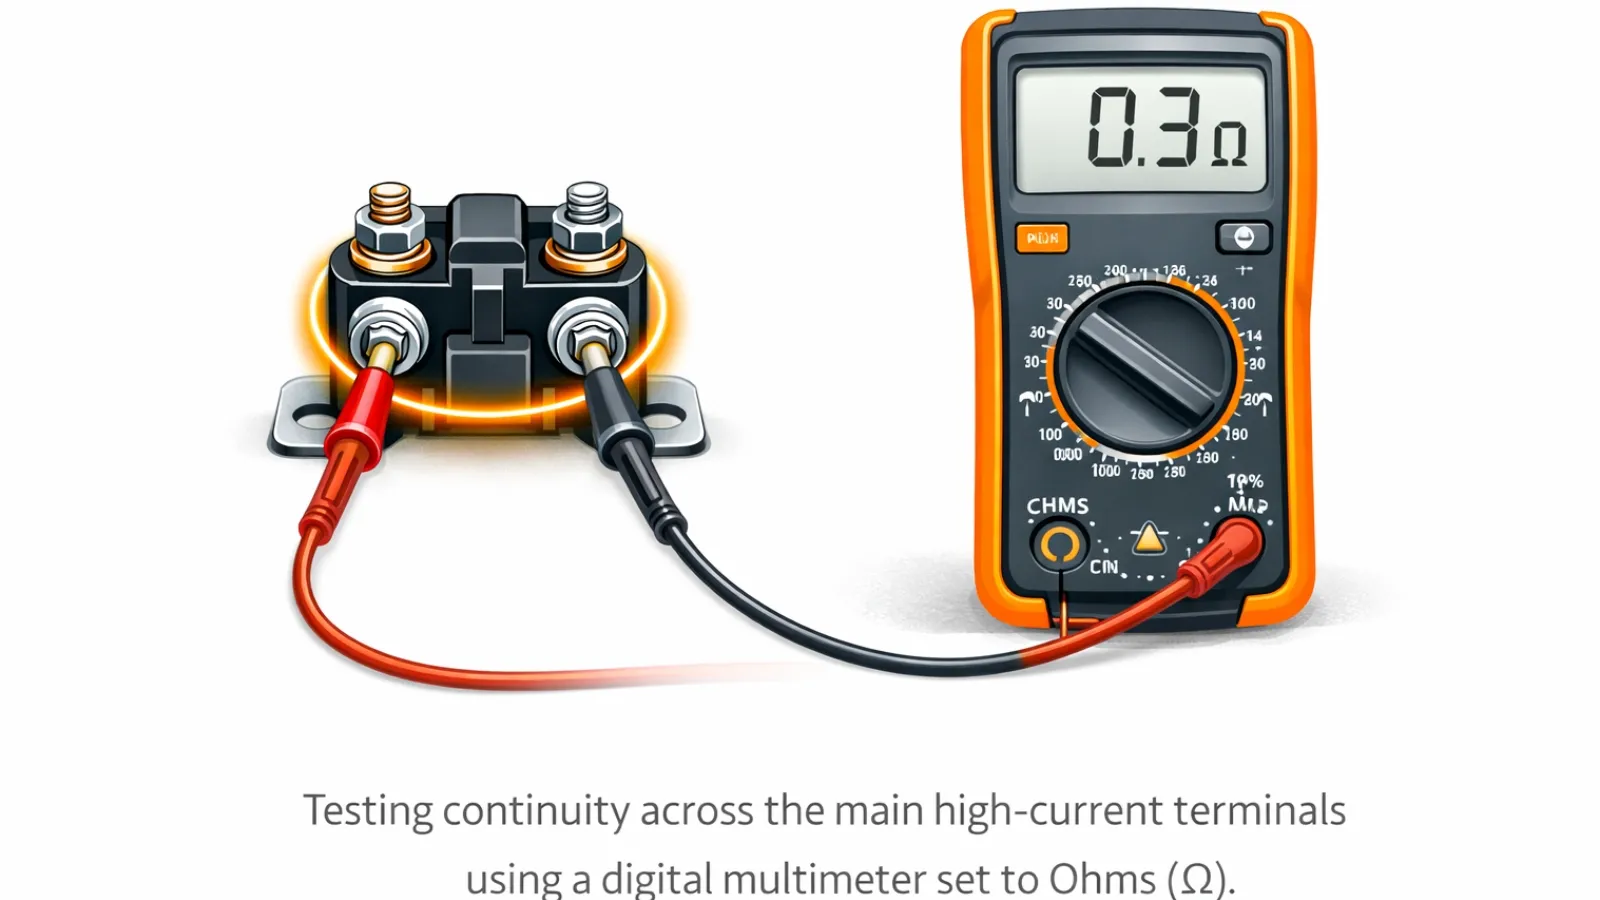
Continuity Test with Multimeter
Ensure Safety
Ensure you wear your safety equipment to avoid being electrocuted and set the multimeter to the Ohms setting.
Connecting Probes and Jumper Cables
Put the probes on the same as before, and ensure the connections are in proper contact. Connect one of the ends of your jumper cables with a battery’s posts or other current sources, and connect the other end with the small power supply terminals.
Diagnosing the Problem
You should hear a click sound after the battery has been connected properly. If you do not hear one, your solenoid coil is faulty, and the whole unit needs to be replaced.
However, if you hear a click sound, your solenoid coil works completely fine.
Note Multimeter Readings
Look at your multimeter results- the reading should be between 0 and 1 or even 2. If so, your solenoid is fine, and the connection is good. If the reading is O.L., you must replace your solenoid as it indicates an incomplete circuit within the solenoid, either from a bad wire or coil or something else.
Now, we will head over to our voltage test to see if the solenoid is getting or functioning with the necessary amount of volt.
Voltage Test with Multimeter
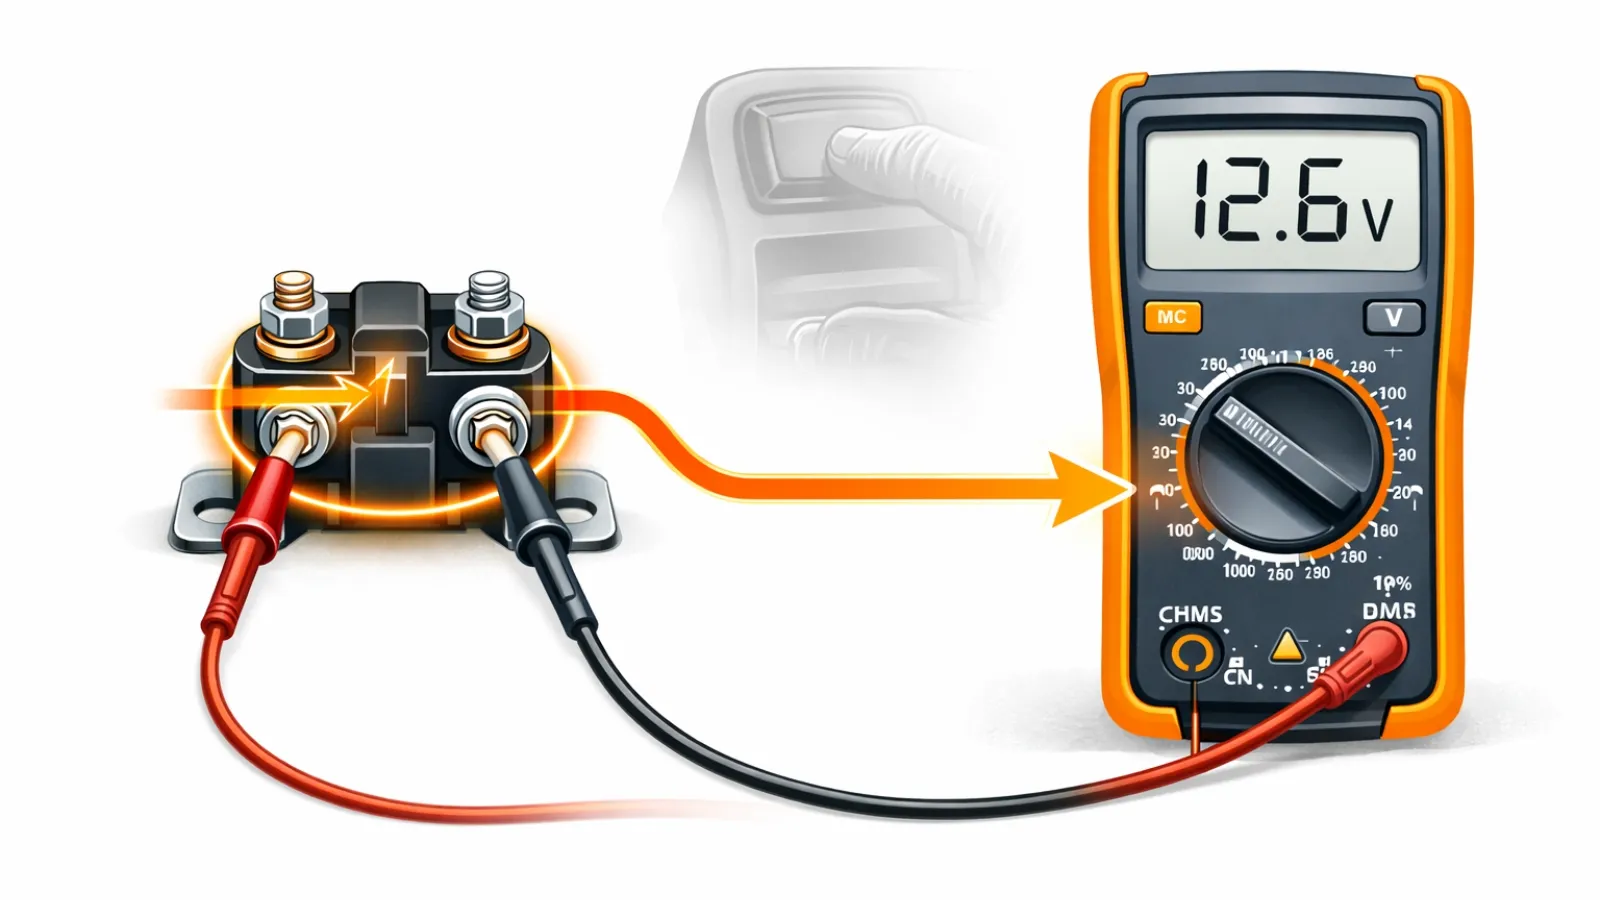
Setting Your Multimeter
Now you will have to set your multimeter to AC/ DC voltage. Most solenoids run in A.C. volts, but some do in D.C., so find out what volts your solenoid uses. If you have not already. You could check your solenoid manuals.
Applying Current
Place each of the multimeter probes on the solenoid terminals (using alligator clips). Negative and positive do not matter here. Apply current the way we have mentioned previously, and you will hear a click with a reading of 12 volts, or at least in the range of 11-13 volts. This means that your solenoid is fine. If your solenoid runs in A.C., ensure your current source, such as the battery, also runs in A.C. This does not apply to the previous test.
Multimeter Reading
If the reading is not between 11 and 13, then your solenoid relay or external wiring might be at fault. This could mean that you do not have to replace the entire solenoid. But if something crucial is damaged in the solenoid, and you will have to change the entire unit.
After confirming a solenoid failure, it’s also worth evaluating whether you have a battery properly rated for winch duty, especially if you frequently perform heavy recovery pulls.
What Your Multimeter Reading Means
After testing the solenoid with your multimeter, use this table to interpret the results:
| Multimeter Reading | What It Means | What To Do |
|---|---|---|
| 0–2 Ohms | Normal coil continuity | Solenoid likely working |
| OL / Infinite | Open circuit (coil failed) | Replace solenoid |
| Very high resistance | Weak internal coil | Replace soon |
| No voltage transfer when activated | Internal contact failure | Replace solenoid |
| Good readings but no winch movement | Possible motor or wiring issue | Test motor next |
Key Reasons Why TATV Winch Solenoid Malfunction
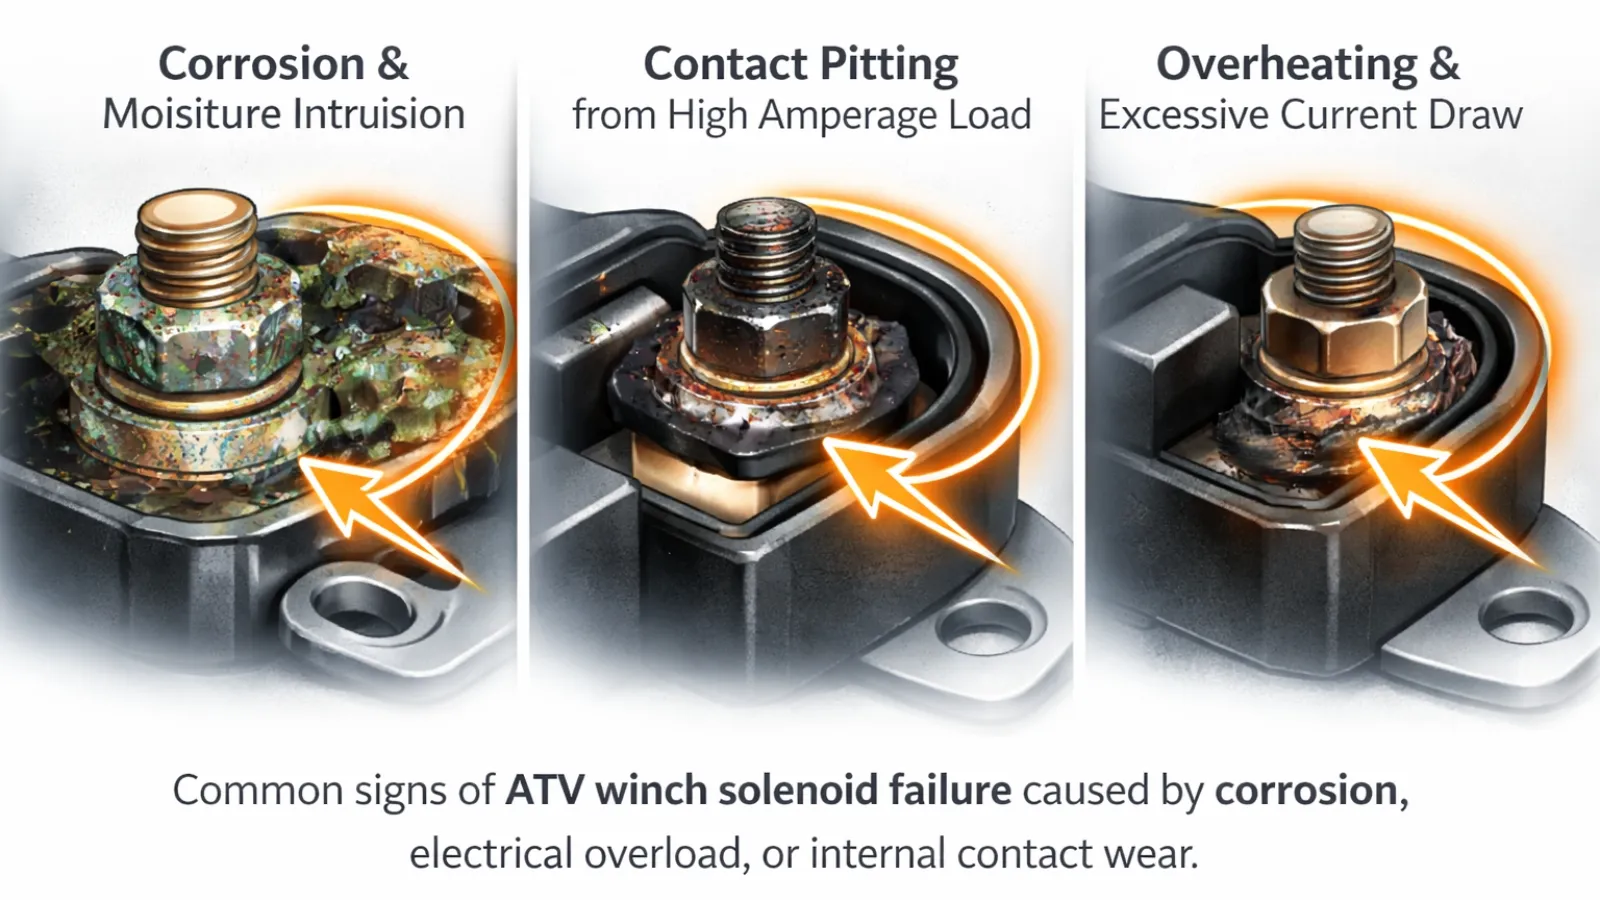
A winch solenoid typically fails due to electrical stress, environmental exposure, or internal contact degradation. Because it operates as a high-amperage switching device, it is subjected to significant load every time the winch is engaged.
Common causes include:
1. Excessive Current Draw
When a winch is overloaded or stalled under heavy resistance, amperage demand increases sharply. Repeated high-load pulls can pit or weld internal contacts, eventually preventing proper voltage transfer. Electrical stress often increases during repeated heavy pulls, especially when the winch exceeds its recommended duty cycle.
2. Moisture Intrusion and Corrosion
ATVs operate in mud, water, and humid environments. If moisture penetrates the solenoid housing or terminal connections, corrosion can develop. This increases resistance and interferes with consistent current flow.
3. Loose or Corroded Electrical Connections
High-resistance connections generate heat. Over time, this heat can damage terminals and accelerate internal contact wear. Loose or poorly fitted battery terminals increase electrical resistance and can interrupt current flow, making diagnosis trickier.
4. Poor Grounding
An inadequate ground connection restricts current return flow, creating intermittent or weak operation that mimics solenoid failure. To avoid Improper wiring, undersized cables, or weak grounding points, proper winch setup is crucial to prevent solenoid wear and voltage loss.
5. Coil Fatigue or Internal Contact Wear
Like any electromechanical component, the solenoid’s internal coil and contacts degrade over time. Continuous cycling eventually leads to open circuits or incomplete engagement.
In many cases, premature solenoid failure is linked to improper load management, incorrect winch sizing, or poor electrical system configuration.
So, ensuring correct winch sizing, wiring integrity, and secure connections significantly reduces stress on the solenoid.
How to Bypass an ATV Winch Solenoid (For Testing Only)
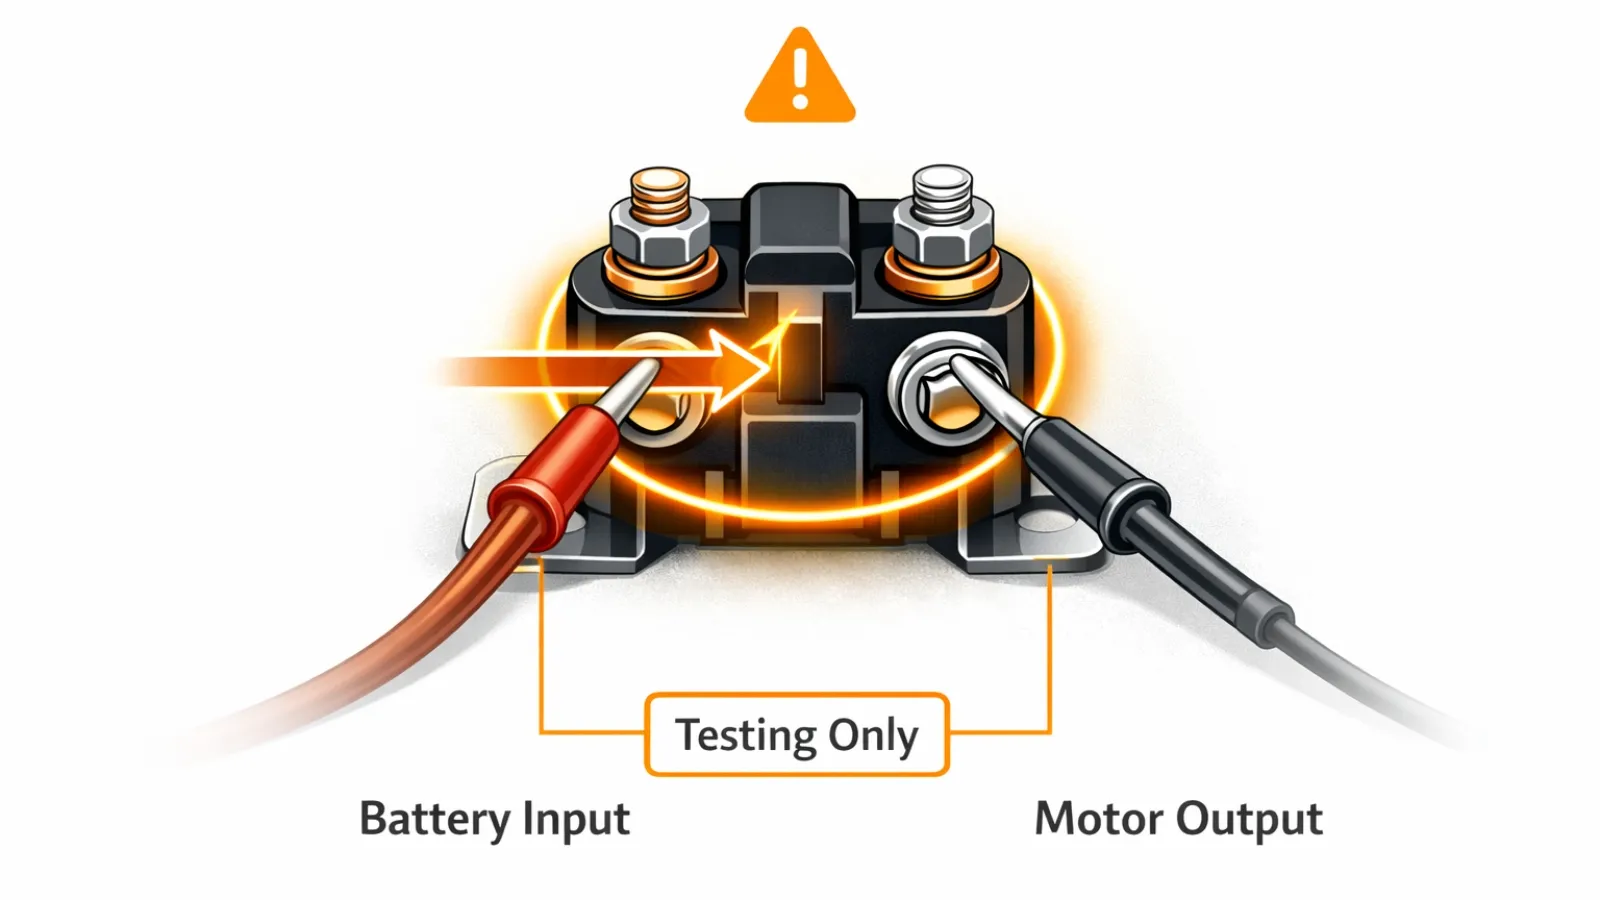
If you’re unsure whether the solenoid is bad, you can temporarily bypass it to confirm.
Warning: This is for testing only. Bypassing removes safety control and may cause sparks.
Steps:
- Turn off the ATV.
- Disconnect the battery.
- Use an insulated screwdriver or jumper cable.
- Briefly connect the two large solenoid terminals.
- If the winch motor runs → the solenoid is faulty.
- If nothing happens → the issue may be the motor, battery, or wiring.
Do not operate your winch permanently without a solenoid. If testing confirms internal failure, selecting a properly rated replacement solenoid is essential for restoring reliable current flow.
FAQs
How Do I Know If My ATV Winch Solenoid Is Bad?
Common signs include clicking but no movement, no response, intermittent operation, or failure in one direction.
Why Does My Winch Click but Not Pull?
Clicking often means the solenoid engages but doesn’t transfer power to the winch motor — often due to internal contacts, low voltage, or poor connections.
Can I Bypass a Winch Solenoid to Test It?
Yes — briefly connecting the solenoid’s large terminals can confirm a bad unit, but don’t operate permanently bypassed for safety.
What Causes a Winch Solenoid to Go Bad?
Corrosion, faulty wiring, low voltage, bad ground, or overload can all lead to solenoid failure.
Can a Winch Work Without a Solenoid?
While technically possible, skipping the solenoid is unsafe and not recommended for regular operation.
How Much Does It Cost to Replace a Winch Solenoid?
Most ATV winch solenoids cost between ~$20–$60, depending on make and amperage rating.
Final Diagnosis: Is Your ATV Winch Solenoid Faulty?
A faulty ATV winch solenoid can completely interrupt power delivery to the motor — even when the battery, wiring, and switch appear functional. Because it controls high-amperage current flow, even minor internal contact failure can prevent the winch from operating under load.
By verifying coil continuity and confirming full voltage transfer with a multimeter, you can isolate the fault quickly and avoid unnecessary replacement of motors, batteries, or cables. If continuity is absent or battery voltage does not pass through when activated, replacement is the correct and reliable solution.
When your winch fails in the field, precise electrical diagnosis makes the difference between a quick repair and being stranded.
Continue exploring related topics:
- Can the issue be the battery, not the solenoid?
- How ATV and UTV winches differ electrically
- Recommended accessories for winch performance and safety

ATVNotes is an off-road resource focused on ATV and UTV winching, recovery systems, safety gear, tires, batteries, and essential off-road equipment. Content is produced by the ATVNotes Expert Team and written from the perspective of a practical off-road recovery advisor, emphasizing real-world performance, system compatibility, and safety-first practices across trail riding, utility use, and off-road exploration.