Ever tried changing an ATV tire and felt stuck before even getting started? That’s because the real challenge isn’t removing the tire — it’s breaking the bead.
The tire bead is the thick, reinforced edge that clings tightly to the rim, sealing in air and stability. Over time, dirt, pressure, and age make that bond almost unbreakable — unless you know the right way to do it.
In this guide, you’ll discover how to safely and efficiently break the bead on an ATV tire, whether you’re using a specialized tool or some clever DIY methods. Stick around — by the end, you’ll have the confidence (and tricks) to do it like a pro.
Jump To Contents
- What is a Tire Bead?
- Safety Precautions Before Bead Breaking
- Tools Required
- ATV Tire Bead Breaking: Step-by-Step Procedure
- Alternative Methods of ATV Tire Bead Breaking
- Common Challenges to Overcome
- Post Bead-Breaking Doables
- Preventive Maintenance Tips
- Key Takeaways: ATV Tire Bead Breaking Made Simple
- ATV Tire Bead Breaking Made Easy
- Frequently Asked Questions FAQs
- How to break tire bead with ply bar?
- How to break a tire bead with C-Clamp?
- Can I use WD-40 or other household lubricants instead of soapy water?
- How do I prevent damaging my ATV rim while breaking the bead?
- Is it necessary to break the bead on both sides of the tire?
- Can I reseat the bead without professional equipment?
What is a Tire Bead?

In the ATV tire anatomy, the tire bead is the edge of the tire that sits firmly against the rim, creating an airtight seal. This component plays a critical role in tire functionality by maintaining air pressure and providing stability.
To go by the tire bead definition, ATV tires are designed with a strong seal between the rim and the tire, known as the bead. This seal ensures proper air retention and stability during rides.
Due to its tight fit, breaking the bead requires specialized tools and techniques. Knowing the structure and role of the bead is essential also for proper tire maintenance and repair.
Now, it’s time to get started. But before diving into the actual process, let’s get our hands ready — understanding the right precautions will make the job safer and far less frustrating.
Recommended Read: Reading and Measuring ATV Tire Size
Safety Precautions Before Bead Breaking
Remember the tire repair safety tips. In this case, before attempting to break the bead on an ATV tire, safety should be the top priority. Follow these precautions:

- Work on a Stable Surface: Common ATV maintenance safety says that you work on a solid, flat surface to prevent the tire from shifting or causing injury.
- Wear Protective Gear: Gloves help protect your hands from sharp edges, and safety glasses shield your eyes from debris.
- Secure the ATV or Tire: If the tire is still mounted, ensure the ATV is immobilized to avoid unexpected movement. If working with a detached tire, keep it steady using a tire stand or similar support.
- Handle Tools Carefully: Bead breakers and tire irons can exert significant force. Use them with controlled movements to avoid slipping and injuries.
Now that you’re prepped and protected, it’s time to gather the right gear. Having the proper tools on hand not only saves effort but also ensures a clean, damage-free bead break.
Tools Required
Having the right tools makes breaking the bead a much easier and safer process. Below are the essential tire repair tools required:

Valve Core Removal Tool
Releasing air from the tire is the first step in breaking the bead. A valve core removal tool is essential for deflating the tire completely, which reduces resistance and makes it easier to work on.
Bead Breaker Tools
- BeadBuster: This specialized tool is designed for efficiently breaking tire beads without damaging the rim or tire. It provides leverage and controlled force, making it an excellent choice for ATV tires bead breaking.
- Alternative Bead Breakers: Other bead breaker tools include hydraulic presses and manual bead breakers. While effective, some may require more effort or adjustments to fit ATV tires properly.
Lubricants
Reducing friction between the tire and the rim is crucial for an easier bead-breaking process. Lubricants help loosen the seal and prevent unnecessary wear.
- Soapy Water Mixture: A cost-effective and commonly used lubricant that helps reduce friction between the tire and rim.
- Commercial Tire Lubricants: Specially formulated to provide maximum slip, reducing the force needed to break the bead.
Tire Irons
Once the bead is broken, removing the tire from the rim requires extra force. Tire irons help with prying the tire off the rim efficiently. Using multiple tire irons provides better control and reduces the risk of damaging the tire.
With your toolkit ready, let’s move to the action.
Recommended Read: Radial vs. Bias Ply ATV Tires Compared
ATV Tire Bead Breaking: Step-by-Step Procedure
Breaking the bead on an ATV tire requires patience and precision. Following a structured process ensures that the task is performed effectively without causing damage to the tire or rim.

Deflation
Before breaking the bead, it is crucial to release all air pressure from the tire to reduce resistance. This makes the process safer and prevents unexpected air bursts.
- Position the tire on a stable surface to prevent movement.
- Use a valve core removal tool to completely release the air from the tire. This step is crucial to minimize pressure buildup and make bead breaking easier.
Knowing how to deflate ATV tires is crucial and warrants practice.
Lubrication
Applying lubrication helps loosen the bead from the rim and reduces the amount of force needed to break it. Proper lubrication can make a difficult job much easier.
- Generously apply soapy water or commercial tire lubricant around the bead.
- Let the lubricant soak for a few minutes to penetrate the tight seal, reducing friction and easing the bead-breaking process.
Reading the tire lubricant tips can amke this task easier.
Positioning the Bead Breaker
Proper placement of the bead breaker tool is necessary to avoid damage to the rim and ensure efficient bead separation.
- Align the bead breaker tool correctly between the rim and the tire sidewall.
- Ensure that the tool is securely in place to avoid slippage and potential damage.
Breaking the Bead
Applying controlled force is key when breaking the bead. Following the right technique ensures the process is smooth and safe.
- Follow the manufacturer’s instructions for operating the bead breaker.
- Apply steady pressure to push the bead away from the rim. Some tires may require multiple attempts in different areas.
- Rotate the tire and repeat the process around the circumference until the bead is fully unseated.
- Flip the tire over and repeat the process on the opposite side to ensure both beads are detached.
For successful and safe tire bead breaking, knowing how to use a bead breaker is important.
That said, not everyone has a professional bead breaker at home — and that’s okay. If you prefer a hands-on or budget-friendly approach, there are alternative methods can get the job done just as well.
Recommended Read: Top-rated 26” ATV Tires to Pick in 2025
Alternative Methods of ATV Tire Bead Breaking
If a dedicated bead breaker is unavailable, the following alternative tire bead breaking methods may be used. While these methods require more effort, they can be effective with proper caution.
Manual Techniques: How to break ATV tire bead by hand
Manually breaking the bead requires strength and persistence. This method is suitable for those who do not have access to specialized tools.
- Using Tire Irons: Insert tire irons between the tire and the rim, then apply force to pry the bead loose. This method requires significant effort and carries a risk of damaging the rim.
- Hammer and Wood Block: Placing a wood block against the sidewall and striking it with a hammer can sometimes help loosen a stubborn bead.
How to break ATV tire bead by hand may sound simple, but the practical task is arduous and so requires a lot of practice. Trying to break tire bead with pry bar might make it far easier. However, researching on how to break ATV tire bead at home is the wisest option before jumping into the field.
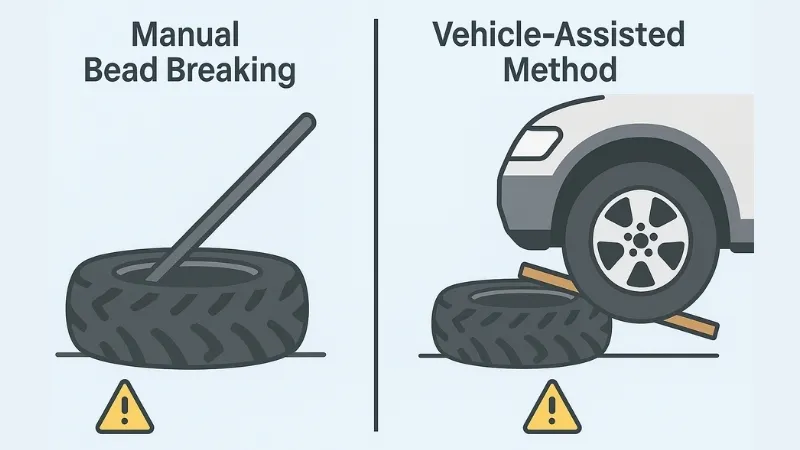
Mechanical Aids: How to break ATV tire bead by a Vehicle
Using external force, such as a vehicle or heavy machinery, can provide additional pressure to break the bead. While effective, these methods should be used with caution.
- Vehicle-Assisted Method: Position a wooden board or metal bar over the tire bead and slowly drive a vehicle onto the board. This applies downward force to break the bead. Exercise extreme caution with this method to avoid damaging the rim or causing injury.
Even with the right tools or techniques, things don’t always go as planned. Bead-breaking has its challenges.
Recommended Read: 6 ply vs 8 ply ATV Tires Comparison
Common Challenges to Overcome
Even with the right tools and techniques, breaking the bead can sometimes be difficult. Recognizing and troubleshooting common tire bead breaking challenges ensures a smoother process.

Stubborn Tire Bead Solution
- If the bead remains intact after multiple attempts, apply additional lubricant and allow it to soak longer.
- Use a heavier-duty bead breaker or try repositioning the tool for better leverage.
Tool Limitations
- Some generic bead breakers may not fit ATV rims properly. In such cases, a specialized ATV bead breaker is recommended.
Yes, the work isn’t quite over even after the bead finally gives way. The next steps — from removing the tire to preparing for reinstallation — are where precision really pays off.
Post Bead-Breaking Doables
Once the bead is successfully broken, proper handling and preparation are necessary before reinstalling the tire or replacing it with a new one.

Tire Removal: After the bead is separated, the tire must be fully removed from the rim. This step should be done carefully to avoid damaging the tire or rim.
Once the bead is fully detached, use tire irons to carefully pry the tire off the rim. Work gradually around the rim to prevent excessive force on any one point.
Inspection: Examine both the tire and rim for cracks, punctures, or excessive wear before reinstalling or replacing the tire.
Preparation for Reinstallation:
- Clean the rim thoroughly to remove debris and old lubricant.
- Apply fresh lubricant around the bead area to make the new ATV tire mounting/installation easier.
Now that the hard part’s behind you, it’s time to think ahead. Consistent maintenance can save you from future struggles.
Preventive Maintenance Tips
Maintaining ATV tires properly reduces the likelihood of bead-related issues and extends tire life. Regular inspections and proper storage can prevent premature wear and tear.
- Regular Inspections: Check tires frequently for signs of wear, embedded objects, or damage.
- Proper Inflation: Maintain the recommended tire pressure to ensure performance and longevity.
- Storage Best Practices: Store ATVs in a way that prevents prolonged pressure on tires, which can cause the bead to stick over time.

Key Takeaways: ATV Tire Bead Breaking Made Simple
- Know the Bead: The tire bead is the tough, sealed edge that keeps your ATV tire airtight and stable — breaking it is essential for any tire repair or replacement.
- Safety First: Always deflate the tire completely, wear gloves and eye protection, and secure your ATV before applying any force.
- Tools Matter: A proper bead breaker, tire irons, and a good lubricant (like soapy water or commercial tire lube) make the job smoother and safer.
- Technique Over Strength: Controlled pressure and proper positioning beat brute force every time — patience prevents rim or tire damage.
- DIY Alternatives Work: No bead breaker? You can still get it done using a pry bar, C-clamp, or even a vehicle-assisted method — with extra care.
- Post-Break Prep: After the bead is separated, inspect and clean the rim, then apply fresh lubricant before reinstalling or replacing the tire.
- Maintenance Pays Off: Regular inspection, correct tire pressure, and proper storage extend tire life and prevent bead-related hassles.
ATV Tire Bead Breaking Made Easy
Breaking the bead on an ATV tire is a necessary skill for maintenance and repair. Using the right tools and techniques ensures the process is safe and effective.
Just master how to break the bead on ATV tires craft from this guide. Thus, you can confidently break the bead on ATV tires and keep your ATV in top condition.
Regular inspection and proper maintenance enhance ATV performance and safety, preventing future issues.
Frequently Asked Questions FAQs
Breaking the bead on ATV tires often raises the following concerns among off-roaders.
How to break tire bead with ply bar?
Insert the pry bar between the rim and bead, apply leverage while moving around the tire, and use a rubber mallet if necessary to separate the bead.
How to break a tire bead with C-Clamp?
Position a large C-Clamp over the tire sidewall and rim, tighten it gradually to apply pressure, and work around the tire until the bead separates.
Can I use WD-40 or other household lubricants instead of soapy water?
While WD-40 can act as a lubricant, it is not recommended for tire work because it can degrade rubber over time. Soapy water or commercial tire lubricants are safer options.
How do I prevent damaging my ATV rim while breaking the bead?
Using a proper bead breaker and applying adequate lubrication can minimize rim damage. Avoid using excessive force with tire irons, and always work gradually around the bead.
Is it necessary to break the bead on both sides of the tire?
Yes, to fully remove the tire from the rim, breaking the bead on both sides is essential. This ensures that the tire can be pried off evenly without causing unnecessary strain.
Can I reseat the bead without professional equipment?
Yes, but it requires caution. Inflating the tire with a high-pressure air compressor while ensuring an even seal can help reseat the bead. Some off-roaders use a ratchet strap around the tire’s circumference to aid in the process.
Recommended Reads include:

ATVNotes is an off-road resource focused on ATV and UTV winching, recovery systems, safety gear, tires, batteries, and essential off-road equipment. Content is produced by the ATVNotes Expert Team and written from the perspective of a practical off-road recovery advisor, emphasizing real-world performance, system compatibility, and safety-first practices across trail riding, utility use, and off-road exploration.