Ever tried squeezing the wrong size boot on your foot? Hurts. Well, the same goes for your ATV when you throw in the wrong battery. If the battery is too big, it won’t sit right. It’ll rattle around like a loose bolt in a toolbox if it’s too small. Both can cause trouble, from poor starting to damaging your ATV’s wiring(winch wiring).
That’s why making sure your ATV battery is the right size and fit isn’t just about convenience; it’s about keeping your machine reliable when you need it most — whether hauling hay bales, spraying the fields, or starting up in the dead of winter.
In the sections ahead, I’ll walk you through easy, no-nonsense steps to make sure you pick the right one every time.
You May Want to Read: Best Battery for ATV with Winch: The Ultimate 2025 Guide
Jump To Contents
- Why ATV Battery Size and Fit Matter
- Check Your ATV Owner’s Manual First
- Learn About Battery Group Sizes
- ATV/UTV Battery Size Chart
- Measure the Battery Compartment
- Step 1 — Gather the tools
- Step 2 — Make it safe before you touch anything
- Step 3 — Remove the cover and the battery (if needed)
- Step 4 — Measure length, width, and height the right way
- Step 5 — Check terminal placement and terminal type
- Step 6 — Measure clearance for the lid, hold-downs, and cables
- Step 7 — Look for obstructions and note mounting details
- Step 8 — Take photos and copy the old battery label
- Step 9 — If the space is tight, your options
- Match Battery Terminal Placement and Type
- Consider Capacity & Power Ratings Alongside Size
- Double-Check Compatibility Online
- Common Mistakes to Avoid When Choosing Battery Size
- When in Doubt—Seek Professional Help
- Quick Checklist Before You Buy
- Wrap Up
Why ATV Battery Size and Fit Matter
When it comes to ATV batteries, size isn’t just about squeezing something into a box. The right battery fit decides whether your machine runs smoothly, stays safe, and lasts for years. Getting the right size is one of the crucial factors to take into consideration while choosing your ATV battery. Let’s break down why.
A Snug Fit Keeps Things Safe
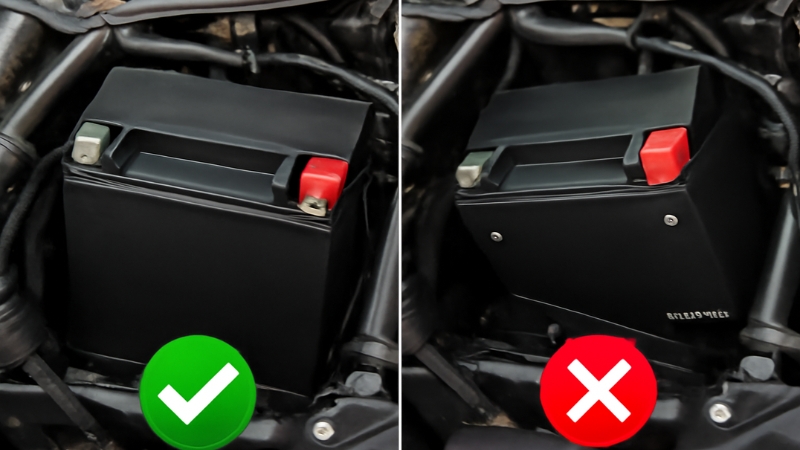
Your ATV isn’t a smooth Sunday drive — it rattles over plowed fields, bounces across muddy trails, and vibrates on rough ground. If your battery doesn’t fit tightly in its tray, it will knock around every time you hit a bump. Over time, that can crack the battery case, loosen the cables, or even spill acid. A snug-fitting battery sits firm and secure, no matter how rough the ride gets.
Wrong Size Means Weak Connections
The terminals on your battery are like the handshake between the battery and your ATV. If the battery is too big or too small, those terminals may not line up properly with the cables. Loose or awkward connections lead to weak power flow, which often shows up as slow cranking or the ATV refusing to start altogether. When your battery fits right, the cables attach cleanly and deliver steady power every time you turn the key.
Bigger Isn’t Always Better
It’s tempting to think a bigger battery will give more power, but that’s not how it works. If the battery doesn’t fit the space your ATV was designed for, you’ll end up forcing it in or leaving the cover half open. A squeezed-in battery can pinch the wires or touch parts it shouldn’t, and that can cause dangerous short circuits. The best battery isn’t the biggest one — it’s the one that matches your machine’s design.
Vibration Resistance Matters
Unlike cars that cruise on smooth roads, ATVs face constant vibration from dirt tracks, rocky paths, and farm chores. A properly sized battery fits snugly in its tray, which helps absorb those vibrations and keeps it steady. That snug fit means the battery lasts longer and doesn’t fail in the middle of hauling, spraying, or towing. In short, fit isn’t just about staying in place — it’s about durability, too.
Now, you know why exact size and fit matter. It’s time to go through the crucial steps that ensure you determine the right size and fit of your ATV battery. The best ATV battery is the one that fits the best in the battery tray and connects the terminals flawlessly.
Check Your ATV Owner’s Manual First
Before measuring or guessing, your ATV’s owner’s manual should be the first place you look. The folks who built your machine already know exactly what kind of battery it needs, right down to the size, shape, and power rating.
Most manuals list the recommended battery group size, along with important details like cold cranking amps (CCA) and amp hours (Ah). These numbers tell you how much starting power and running time the battery should provide.
If you’ve lost your manual, don’t worry. You can usually look up your ATV model online, call the dealer, or even ask at a local repair shop. It’s a quick step that saves you from wasting money on a battery that doesn’t belong in your machine.
In short, the manual is like a recipe card — follow it, and you’ll get the right result every time.
Learn About Battery Group Sizes
If you’ve ever gone to buy a battery and seen strange codes like YTX9-BS or YTZ14S, you might’ve thought, “What that jumble of letters and numbers mean?” It is simply the battery’s group size. And group size is just a fancy way of saying the standard shape and size that fits your ATV’s battery box.
What Group Size Really Means
Think of group size like boot sizes. A size 10 boot might fit your foot perfectly, while a size 11 is too loose and a size 9 is way too tight. Batteries work the same way. Each group size tells you the exact length, width, height, and terminal layout of the battery. That way, the right one will sit neatly in the tray and connect properly to your cables.
Common ATV Battery Group Sizes
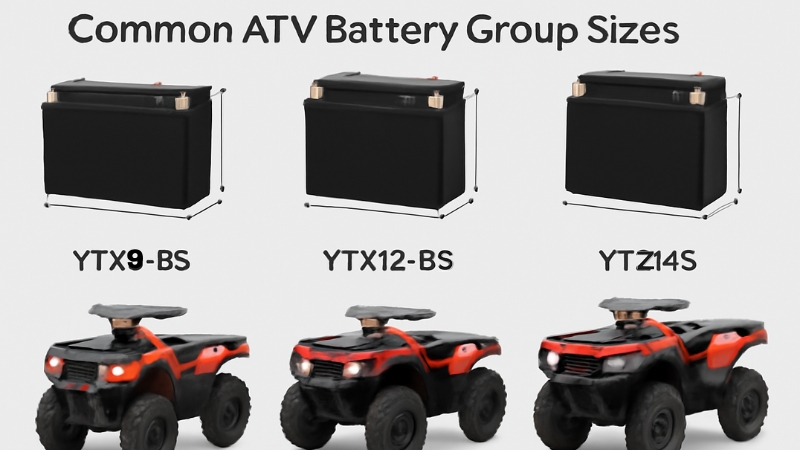
Most ATVs use compact batteries designed for smaller spaces and rough rides. Some of the most common group sizes you’ll run into are:
- YTX9-BS – Very common for mid-sized ATVs.
- YTX12-BS – Slightly bigger, with more starting power.
- YTZ14S – Often found in larger ATVs or ones with winches and extra lights.
Knowing your group size, you can walk into any parts shop and ask for it directly — no guessing, no measuring.
How to Read ATV Battery Codes
ATV battery codes might look confusing, but they actually tell you useful things if you know what to look for. Here’s a simple way to read them:
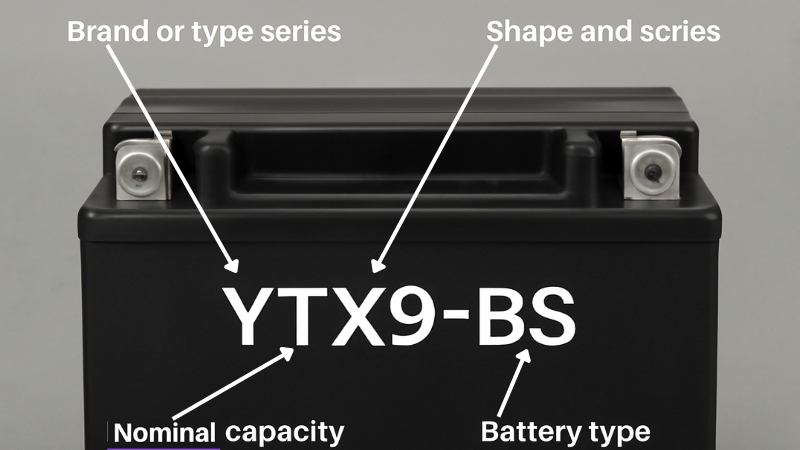
- First Letter (Y) – Brand or type series. Usually not critical for fit, but some brands use it to indicate maintenance-free or gel types.
- TX / TZ – Shape and series within the brand; shows if the battery is compact, tall, or has a particular terminal layout.
TX = standard compact ATV battery shape
TZ = taller/narrower or specialized battery shape
- Number (9 / 12 / 14) – Size reference. Higher numbers usually mean more capacity and a bigger physical size.
- BS or S – “BS” stands for battery sealed, meaning it’s maintenance-free. “S” can also mean sealed.
Example: YTX12-BS
- Y → Brand/type
- TX → Shape and series
- 12 → Size/capacity
- BS → Sealed battery
Quick trick: The numbers and letters after the dash are the most important for fit and terminals. As long as these match, the battery will work in your ATV.
Where to Find the Size Code
The easiest place to check is your old battery. Most batteries have their group size printed right on the top or side. If you pull out your old one and it says YTX9-BS, that’s your group size. Even if the brand changes, as long as the size code is the same, the battery will fit.
Why Group Size Matters
Getting the wrong group size can mean:
- The battery won’t physically fit in the box.
- The terminals end up in the wrong spot, making it hard (or impossible) to hook up your cables.
- The lid or strap won’t close properly, leaving the battery loose.
Bottom line: Know your group size, and you’ll save yourself from headaches and wasted trips to the parts store.
ATV/UTV Battery Size Chart
Before you grab any random battery off the shelf, it’s smart to compare your options side by side. Below is a handy reference chart of some of the most common ATV and UTV battery group sizes, their dimensions, and the types of vehicles they’re usually used in.
Keep in mind that even within the same ATV battery brand, models can vary, so always double-check your owner’s manual or talk to a dealer before buying.
This UTV battery size chart will give you a basic impression.
| Battery Group Size | Dimensions (L × W × H) | Approx. CCA | Commonly Used In |
|---|---|---|---|
| YTX4L-BS | 4.45″ × 2.76″ × 4.13″ | ~50–80 CCA | Small ATVs, youth quads, |
| YTX5L-BS | 4.45″ × 2.76″ × 4.21″ | ~70–100 CCA | Yamaha Raptor 125, Kawasaki KFX 90 |
| YTX7A-BS | 5.91″ × 3.43″ × 3.70″ | ~90–120 CCA | Polaris Phoenix 200, Honda Recon 250 |
| YTX9-BS | 6.00″ × 3.44″ × 4.19″ | ~120–150 CCA | Honda Rancher 350, Yamaha Grizzly 350 |
| YTZ10S | 6.00″ × 3.44″ × 3.74″ | ~190 CCA | Yamaha Kodiak 450, Honda TRX400 |
| YTZ14S | 6.00″ × 3.44″ × 4.38″ | ~230–240 CCA | Yamaha Kodiak 450, Honda TRX400 |
| YTX20HL-BS | 6.87″ × 3.43″ × 6.10″ | ~270–310 CCA | Polaris Sportsman 500, Honda Foreman 500 |
Pro Tip: Use this chart as a starting point, not a final decision. Battery tray sizes, terminal orientation, and even year-to-year model changes can affect fitment. So, measuring your battery compartment and confirming manufacturer recommendations will always be the safest move.
Measure the Battery Compartment
Measuring the battery box is simple if you take it step by step. Get a tape measure, a phone for pictures, and a note to write down — then follow these steps.
Step 1 — Gather the tools
You don’t need much – a tape measure or ruler (inches and cm), a phone or camera, a flashlight, gloves, and a wrench or socket set if you’ll remove the battery. A rag to set the battery on is handy, too. Having these ready makes the job quick.
Step 2 — Make it safe before you touch anything
Turn the key off and take the key out. If you must remove the battery to measure properly, disconnect the negative (black) cable first, then the positive (red) cable. That avoids sparks. Wear gloves and don’t let tools bridge the two terminals — sparks and short circuits can happen fast.
Step 3 — Remove the cover and the battery (if needed)
Many ATVs have a plastic cover or strap over the battery — unclip or loosen that first. If you pull the battery out, set it on a rag or cardboard so it won’t slip. You can often measure with the battery in place, but removing it gives the clearest measurements.
Step 4 — Measure length, width, and height the right way
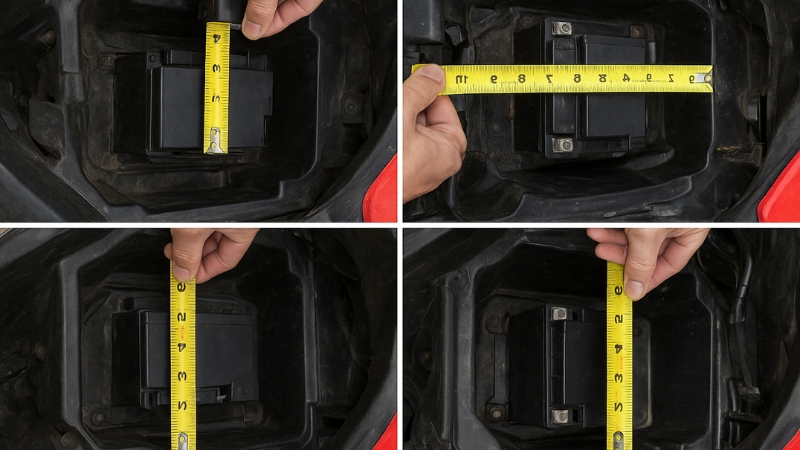
Measure and write down three numbers:
- Length — left to right across the tray.
- Width (or depth) — front to back from the grille side toward the seat.
- Height — bottom of the tray to the highest point of the battery (including terminal posts or vent caps).
Measure the widest points and record to the nearest 1/4 inch (or 5 mm). Write the units (in or cm) so nothing gets mixed up.
Step 5 — Check terminal placement and terminal type
Look where the metal posts or screw terminals sit. Sit on the ATV and face forward — note whether the positive (+) terminal is on the left or the right. Also check the terminal type: top-post, side-post, or screw/bolt type. Terminal position matters — cables must reach without being stretched or bent.
Step 6 — Measure clearance for the lid, hold-downs, and cables
Measure from the top of the battery to the underside of the cover (you need enough room so the cover closes). Check where the hold-down strap or clamp sits and measure that gap. Attach the battery cables and wiggle the battery toward the cable — make sure there’s no tight stretch. If your ATV has accessories (winch, extra lights), leave a little extra cable room.
Step 7 — Look for obstructions and note mounting details
Check for plastic ribs, brackets, wiring looms, fuse boxes, or anything that sticks into the tray — those can stop a thicker battery from fitting. Note the tray lip height and whether the battery sits flat or slopes a bit. If there’s a vent tube for wet batteries, note its position and required clearance.
Step 8 — Take photos and copy the old battery label
Snap a few photos: battery in place (from a few angles), the terminals close-up, and any hold-down hardware. If you still have the old battery, copy the group code or model number printed on it (for example: YTX9-BS). That label is gold when you go buy a new one.
Step 9 — If the space is tight, your options
If measurements are close and a new battery might be a squeeze, you can:
- Find the exact group size that matches those measurements.
- Use a battery tray adapter or a different hold-down that gives a bit more room.
- Switch to a thin-profile battery type (some sealed/AGM batteries are smaller for the same power). If unsure, don’t force a battery in — ask a mechanic or parts shop for help.
You May Want to Read: How to Test an ATV Battery: A Step-by-Step Guide
Match Battery Terminal Placement and Type
Picking a battery that physically fits is only half the job — you also need to make sure the terminals (the spots where your cables connect) are in the right place and the right kind. If they’re not, you’ll either struggle to hook up your ATV’s wiring or, worse, risk frying the electrical system.
Terminal Placement: Left or Right?
When you sit on your ATV seat and look forward, the positive terminal (+) should be on the same side as your old battery. Some batteries have it on the left, some on the right. If you buy one with the positive on the wrong side, the cables may not reach, or you’ll have to twist and stretch them. That’s dangerous because stretched cables can loosen or break when the ATV bounces over rough ground.
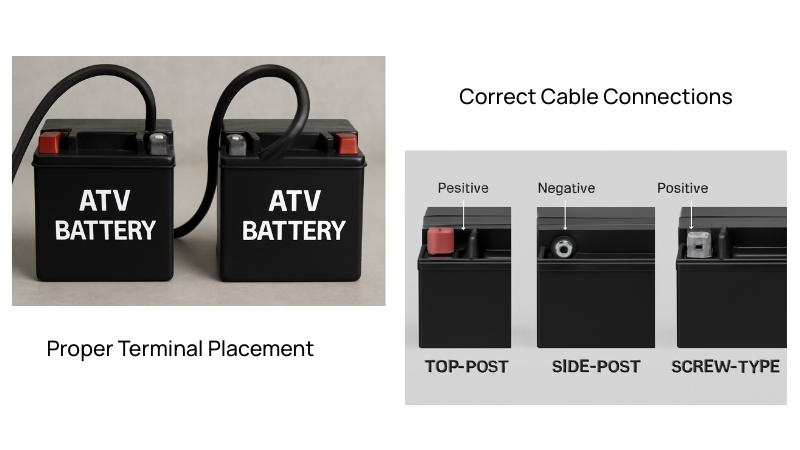
Terminal Type: Posts, Screws, or Side Connectors
ATV batteries come with a few different terminal styles:
- Standard posts – Little stubs sticking up, like car batteries but smaller.
- Screw-type (bolt-on) – Flat plates or blocks with a hole where you tighten the cable with a bolt.
- Side terminals – These are found on some specialty batteries, with connections on the side instead of the top.
Your ATV cables are designed for one type. Forcing the wrong kind can cause a weak connection that cuts out when you need power most.
Why It Matters
- Wrong side = cables too short or too tight.
- Wrong type = poor connection, sparks, or melting around the terminal.
- Loose connections = ATV won’t start or keeps dying halfway through chores.
When you buy a replacement, always compare the new battery’s terminals with your old ones. If they don’t match, put them back on the shelf.
You may want to read: How Many Amps Does an ATV Battery Have?
Consider Capacity & Power Ratings Alongside Size
Even if a battery fits your ATV box like a glove, you still need to check its muscle — the power ratings. That’s where numbers like CCA (Cold Cranking Amps) and Ah (Amp Hours) come in. Think of them as the strength and stamina of your battery.
Cold Cranking Amps (CCA) – The Starting Power
CCA tells you how much “kick” a battery has when starting your ATV in cold weather. The higher the CCA, the stronger the starting punch.
- Why it matters: On frosty mornings, a weak battery may crank slowly, or worse, not start at all.
- Farm example: If you use your ATV before sunrise in winter to check on livestock, you’ll want a battery with enough CCA to fire up even when it’s freezing outside.
In short, CCA is like the strength in your arm when you’re pulling the starter cord on an old machine — the stronger the pull, the quicker it fires up.
Amp Hours (Ah) – The Staying Power
Amp hours show how long a battery can run accessories before going flat. More Ah means more staying power.
- Why it matters: If you use a winch, sprayer, or extra lights on your ATV, you’ll drain the battery faster.
- Farm example: Hooking up a fence sprayer or running a spotlight for late-night chores needs a battery with a higher Ah rating, so it doesn’t die on you in the middle of the job. Fixing dead battery is time-consuming even if you have the required set-up and tools ready.
Ah, it’s like the size of your fuel tank — the bigger it is, the longer you can keep going before you need to refill.
You May Want to Read: How Fast Can an ATV Go?
The Balancing Act: Size vs. Power
Here’s the key: you can’t just chase the highest numbers. A battery with big CCA and Ah ratings might not physically fit your compartment. That’s why it’s important to balance fit with power. The best battery is one that fits perfectly and matches your ATV’s power needs.
Double-Check Compatibility Online
Even if you’ve measured your battery box and noted down all the numbers, it’s always smart to cross-check before you spend your money. Online tools and retailer websites make this step quick and painless.
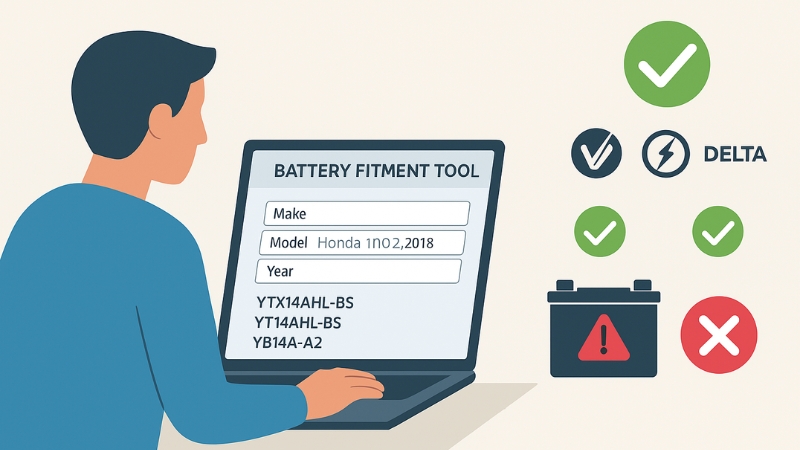
Use Online Fitment Tools
Most battery retailers and parts stores have a simple search tool where you plug in your ATV’s make, model, and year. With one click, it’ll show you the exact battery sizes that fit your machine.
- Example: Type in “Honda Rancher 420, 2018″ and the site will list the correct group size batteries for that model.
- This saves you from standing in the aisle, scratching your head, or guessing between two similar-looking batteries.
Cross-Check With More Than One Source
Don’t just trust one website. Check two or three retailers to see if they recommend the same group size and specs. If all the answers line up, you know you’re safe. If one site lists something different, be cautious — it could be an error or a cheap knockoff listing.
Look for Trusted Brands and Sellers
There are plenty of no-name batteries online that may claim to fit any ATV, but that’s rarely true. A poorly made battery won’t last long, and it might even damage your machine. Stick with trusted brands or buy directly from known retailers.
Why This Step Saves You Trouble
- No wasted trips back to the store.
- No wasted money on returns or exchanges.
- No frustration trying to jam in the wrong battery.
A few minutes online is like double-checking your grocery list before you leave the house — it saves a whole lot of running back and forth.
Common Mistakes to Avoid When Choosing Battery Size
Even simple mistakes can turn buying a battery into a headache. Here are the most common pitfalls and why you should avoid them.
Mistake 1: Assuming Car Batteries Will Work
Car batteries are bigger, heavier, and often have different terminal placements. Just because it looks like it fits doesn’t mean it will. Using a car battery can damage your ATV tray, stretch cables, or even cause electrical problems. Stick to ATV-specific batteries.
Mistake 2: Bigger is Better Thinking
Some folks believe a bigger battery always means more power. Not true. If it doesn’t fit properly, you risk loose connections, rattling, or a lid that won’t close. Bigger batteries don’t equal better performance — the right fit does.
Mistake 3: Ignoring Terminal Orientation
Positive on the wrong side, top vs. side terminals, or the wrong type can make installation impossible or unsafe. Even if the battery fits physically, wrong terminals can leave cables stretched, loose, or sparking.
Mistake 4: Forgetting About Vibration
ATVs bounce over rough terrain constantly. A loose or ill-fitting battery gets rattled, which shortens battery life and can loosen connections. Always make sure the battery sits snugly in its tray.
Mistake 5: Skipping Specs (CCA and Ah)
Some buyers pick a battery by size alone, ignoring its power ratings. Too low, and your ATV struggles to start or run accessories. Always check that the battery meets or exceeds your ATV’s recommended CCA and Ah.
When in Doubt—Seek Professional Help
Sometimes, even after measuring, checking manuals, and browsing online, you might still feel unsure. That’s completely normal — batteries can be tricky, and a wrong choice can cost you time, money, and headaches.
Ask a Dealer or Mechanic
A dealer or local mechanic can confirm the exact battery your ATV needs. They have experience with your model and know which brands fit best. It’s a small investment for peace of mind.
Use Installation Services
Many shops will not only confirm compatibility but also install the battery correctly. This ensures:
- Proper terminal connections
- Secure fit in the tray
- Correct hold-down and clearance for cables
This is especially helpful if your ATV has extra accessories like a winch, sprayer, or lights.
When to Seek Help
- If your measurements are very tight and you’re unsure about clearance.
- If the new battery looks slightly different from the old one.
- If the terminal type or position seems off.
A quick check from a professional can prevent a lot of frustration later.
Quick Checklist Before You Buy
Before you hand over your hard-earned money, go through this checklist to make sure you’ve got the right ATV battery:
✅ Battery group size: Matches your manual or old battery
✅ Measurements: Length, width, and height fit snugly in the tray
✅ Terminal placement: Positive (+) on the correct side for your cables
✅ Terminal type: Top-post, side-post, or screw-type matches your ATV
✅ Power ratings: CCA and Ah meet or slightly exceed the manufacturer’s recommendation
✅ Hold-down clearance: Straps or clamps fit and secure the battery
✅ Cable reach: No stretching, twisting, or tight bends
✅ Vibration check: Battery sits firmly and won’t rattle
✅ Cross-checked online: Multiple reliable sources confirm compatibility
✅ Professional help: Consult if unsure or measurements are tight
Keep this checklist handy when you go to the store or order online — it’s a simple way to avoid mistakes and frustration.
Wrap Up
Getting the right ATV battery isn’t just about cranking power — it’s about safety, reliability, and peace of mind. A battery that fits snugly, has the right terminals, and meets power requirements will start your ATV every time, survive the bumps of farm life, and keep your accessories running without trouble.
Take your time – measure carefully, check your manual, double-check online, and don’t hesitate to ask a mechanic if you’re unsure. A little preparation now saves hours of stress later, keeps your ATV running smooth and ensures your farm chores never skip a beat.
Relevant reads include:
How Long to Charge an ATV Battery ? – Factors Affecting Charge Time

ATVNotes is an off-road resource focused on ATV and UTV winching, recovery systems, safety gear, tires, batteries, and essential off-road equipment. Content is produced by the ATVNotes Expert Team and written from the perspective of a practical off-road recovery advisor, emphasizing real-world performance, system compatibility, and safety-first practices across trail riding, utility use, and off-road exploration.