Nothing kills an ATV adventure faster than a leaking tire. One minute you’re ripping trails, the next you’re limping back, worried the tire won’t last. Beyond being annoying, it’s also a safety risk if the leak worsens mid-ride.
While punctures get most of the blame, the real troublemaker is often the tire bead—the seal where rim and rubber meet. Dirt, rust, or poor seating can break that bond and cause a slow leak. But beads aren’t the only culprits. Valve stems, tiny punctures, or even dry rot can deflate your ride just as quickly.
The good news?
Yes, most leaks are fixable with a little know-how. This guide shows you how to spot and fix bead leaks, tackle other leak types, and prevent future air-loss headaches.
But first, let’s get clear on what’s really happening when your ATV tire starts losing air.
You May Want to Read: Best 26 Inch ATV Tires of 2024 & Beyond: Top 7 Models Reviewed
Jump To Contents
- Understanding ATV Tire Leaks
- Common Causes of ATV Tire Bead Leaks
- How to Identify a Bead Leak?
- Get The Required Tools and Materials Ready
- Step-by-Step Guide: Fixing a Leaking Bead on ATV Tire
- Alternative Fixes for Minor Bead Leaks
- Fixing Other Types of ATV Tire Leaks
- Preventing ATV Tire Bead Leaks in the Future
- When to Replace Instead of Repair
- Do Ply Rating and Tire Construction Affect ATV Tire Leaks?
- Key Takeaways
- Wrap Up
- FAQs – Frequently Asked Questions
Understanding ATV Tire Leaks
ATV tires aren’t built like car tires, and that makes them more prone to air loss. They’re designed for rough terrain, flexible sidewalls, and lower PSI—great for grip, though not so great for holding air perfectly.
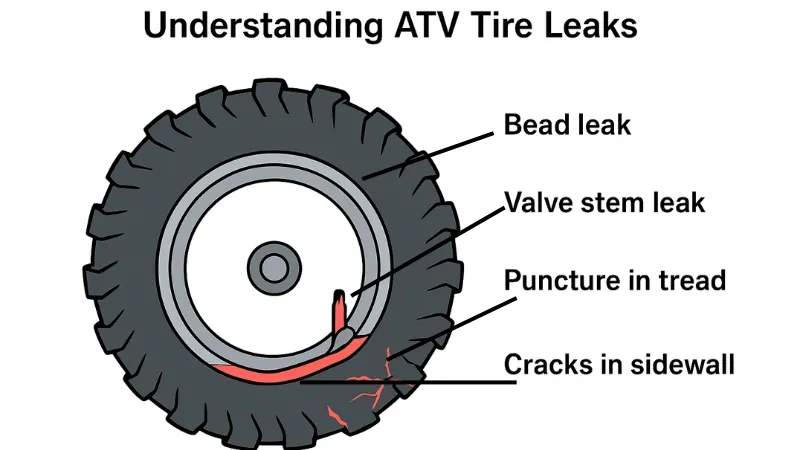
Leaks usually fall into four camps:
- Bead leaks – The most common type. This happens when the tire fails to seal tightly against the rim. Dirt, rust, or a bent rim can create tiny gaps that slowly let air out.
- Valve stem leaks – The valve stem is small but mighty. If it’s cracked, corroded, or loose, it can leak steadily, even if the rest of the tire looks perfect.
- Punctures – Sharp rocks, nails, thorns, or even debris on the trail can puncture the tread, leading to sudden or slow leaks depending on the size of the hole.
- Sidewall damage or dry rot – Over time, rubber weakens. Cracks in the sidewall or aging, dried-out rubber can cause air to seep out—problems you usually can’t repair safely.
The tricky part? All leaks show up the same way—your tire won’t hold air. Pinpointing the source saves time and tells you whether it’s a quick fix or a full replacement job.
With that clear, let’s dive into the usual suspect – bead leaks and their causes.
Common Causes of ATV Tire Bead Leaks
If your ATV tire is leaking, odds are the bead is to blame. The bead is the rubber edge that presses against the rim to form an airtight seal. When that bond fails, air sneaks out. Here’s why it happens:
- Dirt and mud buildup – Off-roading kicks debris into every crevice, and when mud or sand gets between the bead and rim, the seal weakens.
- Rust or corrosion on the rim – Moisture eats away at metal rims, leaving pits and rough spots that prevent the bead from sealing properly.
- Improper seating – If the bead wasn’t mounted right in the first place, it may never seal tightly. You’ll often see this after a sloppy install.
- Low tire pressure – Running low PSI can make the bead separate from the rim during a ride, starting a slow leak.
- Rim damage – A bent or dinged rim from hitting rocks, stumps, or curbs creates gaps along the bead line.
- Old or dry rubber – As tires age, the bead can crack, harden, and lose flexibility, which makes it tough to keep a seal.
- Temperature swings – Hot days expand air, cold nights contract it. Those pressure shifts can loosen or break a bead that’s already iffy.
- Sitting idle too long – Tires left unused can dry out, or moisture trapped at the rim can corrode the bead area, both leading to leaks.
Now that you know why bead leaks happen, the next step is figuring out if that’s really your problem.
How to Identify a Bead Leak?
Before you grab sealant or tools, you need to be sure the bead is the culprit. Luckily, spotting a bead leak isn’t rocket science—you just need a few checks and a bit of patience. Here’s how:
- Visual inspection – Look closely where the tire meets the rim. Dirt, corrosion, or small gaps can be visible clues. Any signs of cracking or old sealant failing? That’s a red flag.
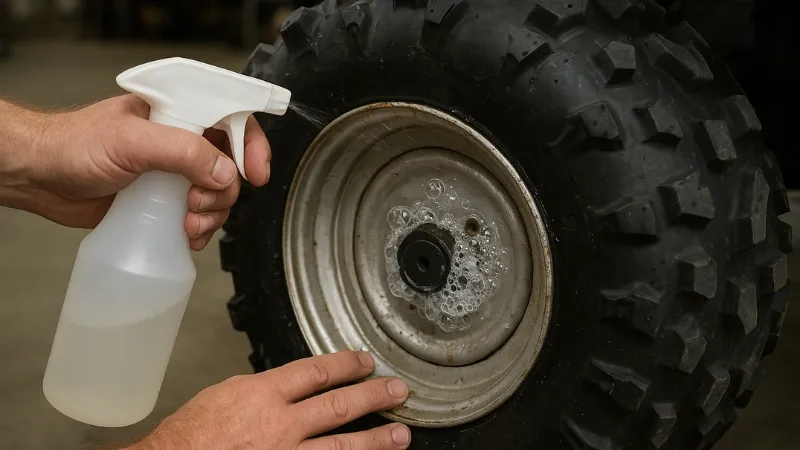
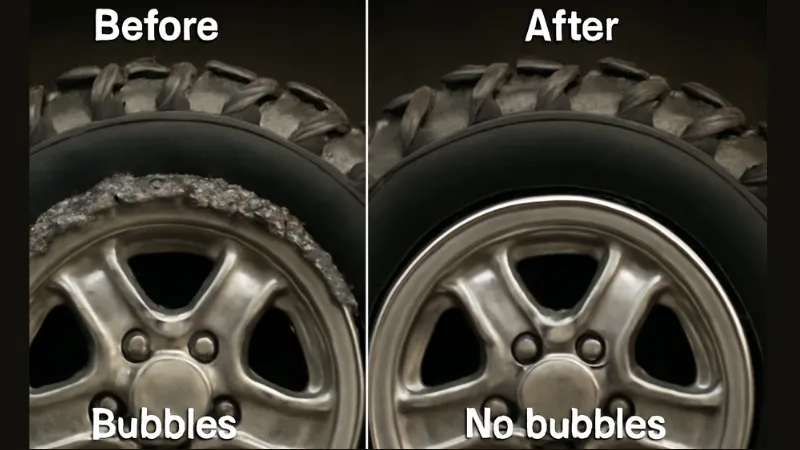
- Soap and water test – Mix water with a bit of dish soap, then brush or spray it along the bead line. If bubbles form, you’ve found escaping air. Small, steady bubbles usually point to a bead leak.
- Listen and feel – Sometimes a slow leak can be heard as a faint hiss. Run your hand carefully along the bead (without spinning the tire) to feel for air.
- Submerge the wheel (if possible) – If you have access to a large tub or shallow water, partially submerging the tire can reveal tiny leaks as air bubbles.
- Check for multiple leaks – Don’t assume one leak means it’s the only one. Inspect the valve stem and tread too—sometimes bead and valve leaks happen simultaneously.
Once you confirm it’s the bead, you’re ready to grab your tools and fix it.
Get The Required Tools and Materials Ready
Before you dive into fixing a bead leak, it helps to have the right gear. A well-prepared toolbox makes the job faster, safer, and less frustrating—especially if you’re on the trail. Here’s what you’ll want:
- Jack – To safely lift your ATV off the ground. A sturdy one is a must for any wheel work.
- Bead breaker – A specialized tool to separate the tire from the rim. No bead breaker? DIY tricks like a plank, hammer, or hinge tool can work in a pinch.
- Valve core removal tool – Useful for releasing air quickly and reseating the bead.
- Soapy water spray – Helps lubricate the bead and rim while checking for leaks.
- Wire brush, sandpaper, or Dremel tool – Clean off rust, mud, and corrosion for a tight seal.
- Bead sealer or tire sealant – The star of the fix; choose a product compatible with ATV tires.
- Ratchet strap – Helps force the tire outward for proper bead seating when inflating.
- Portable repair kit – Include plugs, patches, and a pressure gauge for quick trail-side fixes.
Tip: Even if you’re fixing the tire at home, carrying a small repair kit on rides can save you hours of headache when a leak pops up unexpectedly.
With all tools ready, it’s time to get hands-on and get your tire sealed and trail-ready.
Step-by-Step Guide: Fixing a Leaking Bead on ATV Tire
Fixing a bead leak might sound tricky, but with the right approach, it’s totally manageable—even on the trail. Follow these steps carefully to get your tire airtight again.
Learn: How to Remove ATV Tire from Rim in 5 Simple Steps
1. Remove the Tire
First things first: lift your ATV safely using a jack. Remove the wheel and make sure it’s stable before doing any work. Safety matters—don’t rush this step. Once off, lay the wheel on a flat, clean surface.
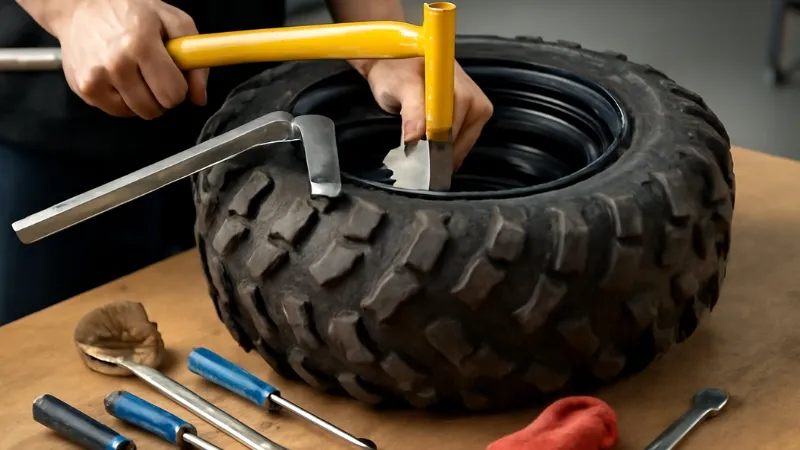
2. Deflate and Break the Bead
Completely deflate the tire by removing the valve core. Then, separate the bead from the rim using a bead breaker. If you don’t have one, a plank and hammer or a hinge tool can work. Take it slow—you don’t want to damage the tire or rim.
3. Clean the Rim and Bead Area
The bead won’t reseal properly if there’s dirt, rust, or old sealant. Use a wire brush, sandpaper, or Dremel tool to clean both the rim and the tire bead thoroughly. Even tiny pits or mud spots can prevent a proper seal.
4. Apply Bead Sealer or Sealant
Now comes the magic. Apply a thin, even layer of bead sealer or compatible tire sealant along the bead. Make sure to cover the entire circumference. This fills tiny gaps and prevents air from escaping once the bead is seated.
5. Reseat the Tire
Lubricate the bead and rim with soapy water. Then, inflate the tire slowly. Use a ratchet strap if necessary to push the tire outward until the bead pops into place. You should hear a faint “pop” or see the bead line settle evenly against the rim.
6. Check for Leaks Again
Once the bead is seated, spray soapy water along the bead line. Look for bubbles—if you see any, the seal isn’t perfect yet. Address any remaining leaks before reinstalling the wheel. Don’t skip this step; a proper seal is essential for safety.
7. Reinstall the Tire
Finally, mount the wheel on the ATV back and torque the bolts to the manufacturer’s specs. Inflate to the correct PSI and double-check for leaks. Your tire should now hold air like new.
Pro Tip: Always inspect the valve stem, sidewalls, and tread during this process. Sometimes bead leaks happen alongside minor valve leaks or small punctures, so catching them early saves future headaches.
Knowing how to fix a bead leak properly is great but it requires a well-equipped mechanic arsenal. But alternative fixes and trail-side solutions can be handy when you don’t have a full toolset handy.
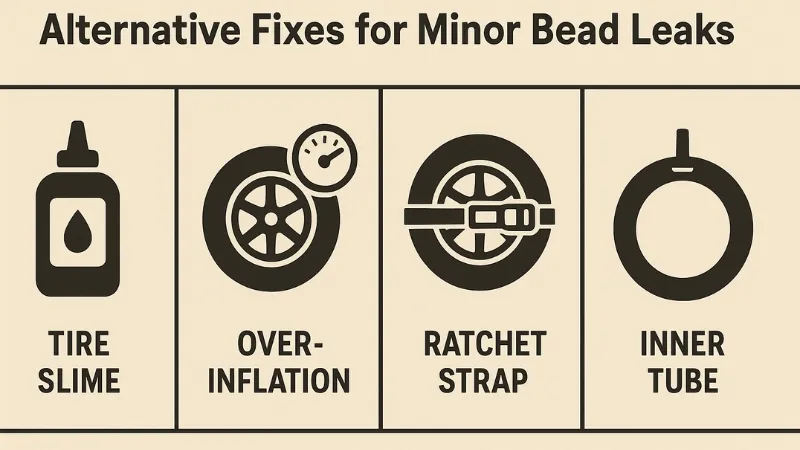
Alternative Fixes for Minor Bead Leaks
Not every bead leak requires a full teardown. Sometimes, especially on the trail, you can get your tire back in shape with quicker, temporary fixes. These aren’t always permanent, but they can save the ride until a proper repair is possible.
1. Tire Slime or Sealant
A popular option is injecting tire slime or liquid sealant into the tire. It coats the inside and seals minor gaps at the bead or small punctures. Quick and effective for slow leaks—but remember, it’s a temporary fix and may not last forever.
2. Over-Inflation Method
If you don’t have sealant handy, inflating the tire slightly above the recommended PSI can sometimes force the bead back against the rim. This is a short-term trick, so don’t ride aggressively at higher pressure.
3. Ratchet Strap Technique
Wrap a ratchet strap around the tire and rim, then tighten to push the bead outward. Inflate while keeping pressure on the strap—this helps the bead snap into place without removing the tire. Perfect for stubborn leaks in the field.
4. Using an Inner Tube
For tubeless tires that won’t seal, you can install an inner tube. It acts as a barrier to hold air if the bead refuses to seal. But you must be cautious of the inner tubes can spin inside the tire if not secured, potentially damaging the valve stem.
Pro Tip: These fixes work in a pinch, but once you’re home, a full bead clean, seal, and proper reseating is the safest long-term solution.
Next, we’ll cover other types of ATV tire leaks—valve stem issues, punctures, and sidewall damage—so you can handle any air-loss situation.
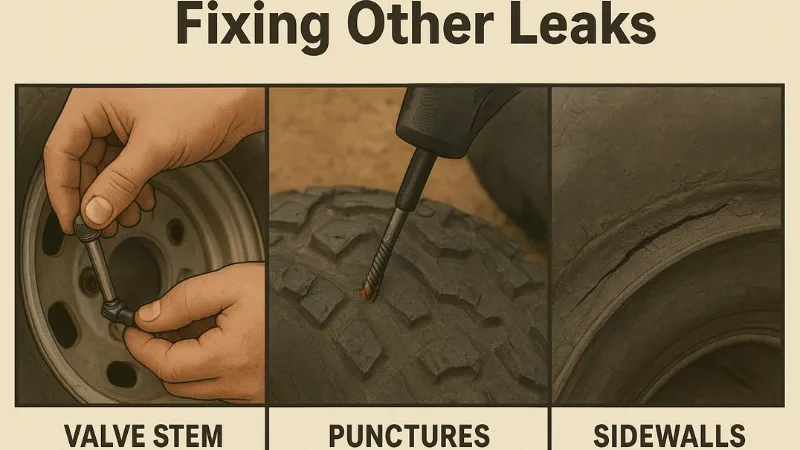
Fixing Other Types of ATV Tire Leaks
Not all leaks start at the bead. Your ATV tire can lose air in several other ways, and knowing how to tackle them keeps you safe and rolling.
1. Valve Stem Leaks
The valve stem is small but critical. If it’s cracked, corroded, or loose, air can escape steadily. Solution is to remove the core, clean the stem, apply a bit of soapy water to check for bubbles, and tighten or replace the stem if necessary. A new valve core is cheap and easy to swap, saving you a lot of headache.
2. Punctures in the Tread
Nails, thorns, and sharp rocks can pierce the tire. Small punctures can be repaired with a plug kit or internal patch. Clean the hole, insert the plug or patch according to the instructions, and inflate carefully to check for leaks. Larger holes may require a full tire replacement.
3. Sidewall Damage or Dry Rot
Sidewall cracks, bulges, or dry rot are serious. Unlike the tread, these areas can’t reliably be patched. If you notice air slowly escaping or see visible cracks, it’s time for a new tire. Riding on a compromised sidewall is unsafe and can cause sudden blowouts.
Pro Tip: Always inspect the entire tire—not just the bead—before heading out. Sometimes minor valve leaks or small punctures happen alongside bead issues, so catching them early prevents surprises on the trail.
Once your tire is repaired, it’s smart to focus on prevention. Let’s move on to preventing ATV tire bead leaks and other air-loss problems.
Preventing ATV Tire Bead Leaks in the Future
Fixing a leak is satisfying, but prevention keeps you riding longer without headaches. A few simple habits go a long way:
- Keep rims clean and rust-free – Dirt, mud, and corrosion are the top culprits. Clean your rims regularly and wipe off moisture after wet rides.
- Maintain proper tire pressure – Underinflation can separate the bead, overinflation can stress the tire. Check PSI before every ride, especially in changing temperatures.
- Avoid overloading the ATV – Too much weight puts extra pressure on the bead and sidewalls. Follow manufacturer limits.
- Store your ATV properly – Tires left unused can develop dry rot or rim corrosion. Keep your ATV in a cool, dry place, off the ground if possible.
- Use quality sealants – When mounting new tires, apply bead sealer for an extra airtight barrier.
- Inspect valve stems – Check for cracks or corrosion regularly. A small stem leak can mimic a bead leak.
- Ride regularly – Tires that sit idle for months are more likely to develop air-loss issues from drying out or moisture buildup.
By combining these habits with regular inspections, you’ll drastically reduce the chance of another slow leak or bead problem.
Yes, preventive measures can defer ATV tire leaks, leaks detected on time are fixable, but a time will come when a tire will go beyond repair.
When to Replace Instead of Repair
Not all leaks are worth fixing. Sometimes, trying to patch a tire can put you at risk or cost more time than it’s worth. Here’s when replacement is the smarter move:
- Worn or cracked tires – If the tread is shallow or the bead rubber is cracked and hardened, repairs may not hold.
- Severely corroded or bent rims – Even a tiny gap in the rim can cause recurring bead leaks; structural damage is unsafe to patch.
- Recurring leaks – If you’ve sealed and reseated the bead multiple times and it keeps leaking, it’s a sign the tire or rim isn’t up to the task.
- Blowouts, bulges, or sidewall damage – These are non-repairable safety hazards. Never ride on a compromised sidewall.
- Structural rim damage – Dents, deep scratches, or warps that compromise the seal mean it’s time to invest in a replacement rim.
Pro Tip: Always err on the side of caution. A new tire or rim is cheaper than risking a blowout mid-ride.
You May Want to Read: Best 8 Ply ATV Tires of 2025 & Beyond: Top 8 Products Reviewed
Do Ply Rating and Tire Construction Affect ATV Tire Leaks?
When it comes to ATV tire leaks, the construction and strength of the tire play a bigger role than most riders realize. Both ply rating and whether the tire is bias-ply or radial can influence how likely your tire is to spring a leak.
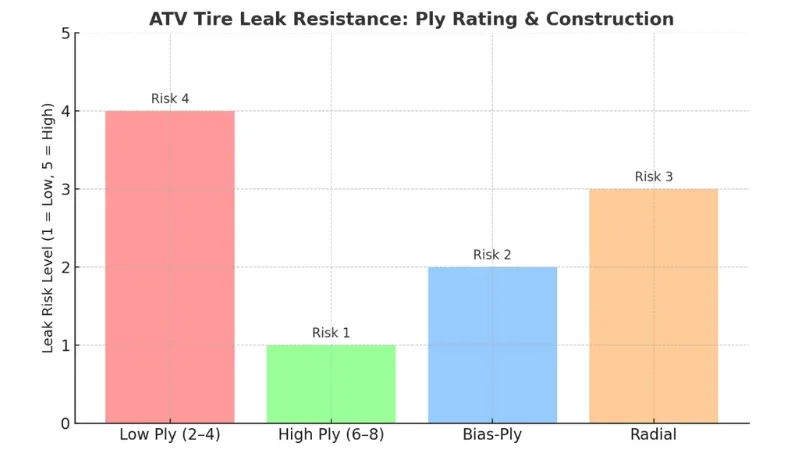
Ply Rating and Leak Resistance
- Higher ply rating means tougher defense – Tires with 6-ply or 8-ply construction have thicker sidewalls, making them more resistant to punctures from rocks, branches, and sharp debris. They don’t make your tire “leak-proof,” but they do reduce the risk.
- Lower ply rating sacrifices durability – A 2-ply or 4-ply tire rides softer and lighter, but it’s much easier for thorns or sharp stones to punch through and create slow leaks.
Bias-Ply vs. Radial Construction
- Bias-ply tires – Built with crisscrossed nylon or polyester layers, these tires have stiffer sidewalls. That extra stiffness makes them more resistant to bead leaks at low PSI and sidewall punctures, which is why they’re popular in rough ATV terrain. The downside? When they do get damaged, they can split more dramatically.
- Radial tires – Designed with perpendicular cords and reinforced belts, radials offer smoother rides and better traction. However, their thinner sidewalls are more prone to punctures and bead leaks, especially if you’re running low air pressure on rocky trails.
If you ride rocky trails or regularly air down your ATV tires, going with a higher ply rating and bias-ply design can help you avoid bead and sidewall leaks. But if comfort and smoother rides matter most, radials are still an option—you’ll just want to keep an eye on your air pressure.
Key Takeaways
- Bead leaks are common but usually fixable with proper cleaning, sealant, and reseating.
- Inspect the entire tire—valve stem, tread, and sidewalls—to catch all potential leaks.
- Carry a trail-side repair kit: sealant, plug kit, pressure gauge, and valve tools.
- Prevent problems: maintain tire pressure, keep rims clean, and store your ATV properly.
- Know when to replace: sidewall damage, recurring leaks, or damaged rims mean it’s time for a new tire.
- Temporary fixes can work on the trail: tire slime, ratchet strap method, or slight over-inflation can get you home safely.
- Regular maintenance saves money: checking beads, valve stems, and tire pressure prevents costly repairs or replacements.
- Ride smart: avoid overloading and be mindful of rough terrain to minimize bead stress and leaks.
Wrap Up
A leaking ATV tire can quickly turn a fun ride into a frustrating ordeal, but most leaks—especially bead leaks—are fixable with the right approach. By understanding the types of leaks, identifying the culprit, and using proper tools and techniques, you can get your tire sealed safely and efficiently.
Remember, prevention is just as important: clean rims, proper tire pressure, and regular inspections go a long way toward keeping your tires airtight. And when a tire or rim is beyond repair, replacing it is always the safest choice.
Tackling bead leaks, punctures, and valve issues may seem intimidating at first, but once you know the steps, it becomes a straightforward part of ATV maintenance.
FAQs – Frequently Asked Questions
1. How do I know if my ATV tire leak is from the bead or valve stem?
A bead leak usually shows up where the tire meets the rim and can often be detected with a soap-and-water test or visual inspection for gaps. Valve stem leaks occur at the stem itself, sometimes forming bubbles or a faint hiss near the valve core. Checking both areas ensures you don’t miss a simultaneous leak.
2. Can I use regular car tire bead sealer on ATV tires?
Not always. ATV tires have lower PSI and more flexible sidewalls. Using a car-specific sealer may not bond properly. It’s best to choose a sealant designed for ATV or off-road tires for a reliable seal.
3. How long does a bead sealer fix usually last?
A good bead sealer can last months to years depending on conditions, tire age, and maintenance. Extreme off-road use or frequent pressure changes can reduce its lifespan, so inspect the bead regularly.
4. Is tire slime safe for ATV tires with bead leaks?
Yes, for small leaks or punctures. However, it’s often a temporary solution. It works best in combination with proper bead cleaning and seating once you’re home.
5. Can a leaking bead be fixed without removing the tire?
Sometimes, small leaks can be temporarily fixed using sealants, over-inflation, or the ratchet strap method. But a full reseating after cleaning the rim is the safest, long-term fix.
6. What tools should I always carry on the trail for emergency tire fixes?
A portable repair kit, pressure gauge, valve core tool, and a small amount of sealant or tire slime can save a ride. A compact bead breaker isn’t always practical, but having repair options makes a huge difference.
7. Should I use an inner tube if my bead won’t seal properly?
Yes, it’s a valid temporary fix. Just be careful—inner tubes can spin inside the tire, potentially damaging the valve stem. Use this method mainly to get home safely.
Relevant Reads include:
Free Country ATV Tires Reviews: Are They Any Good?
Why Are ATV Front Tires Smaller Than Rear Tires?

ATVNotes is an off-road resource focused on ATV and UTV winching, recovery systems, safety gear, tires, batteries, and essential off-road equipment. Content is produced by the ATVNotes Expert Team and written from the perspective of a practical off-road recovery advisor, emphasizing real-world performance, system compatibility, and safety-first practices across trail riding, utility use, and off-road exploration.